This is gonna be one of those posts with way too many photos, but not because it’s one of my random collections of Fun Friday Photos. With this one I hope to assist anyone who may need help to troubleshoot and fix RV water heater issues. Specifically, I’ll show how to repair an RV water heater that no longer heats water.
This isn’t the first time I’ve written about servicing an RV water heater. Knowing how to replace the water heater anode should be on every RVers annual maintenance list. I’ve even previously provided steps to replace the water heater element when your RV water heater no longer delivers hot water. But this job seems to get more complicated each time. This time I include how to replace the water heater thermostat. But you’ll see its really not all that complicated.
What To Do When Your RV Water Heater Won’t Get Hot
When our hot water wasn’t very hot one day, I knew I had a new project on my hands. The first thing was to determine why the water wasn’t heating up. STEP 1: I switched he water heater from AC electric service, to gas on the DC circuit. Good news! By burning through propane, we would at least have hot water while I got the parts needed to repair the electric RV water heater.
Rene was leaving me for her Tucson show, so I wanted to ensure I had all the parts necessary to do the job. I decided to get a replacement RV water heater thermostat switch, in addition to a new electric heater element. Good thing I did. But how do you know if the thermostat is bad? What if the power switch was the problem?
NOTE: Click photos to enlarge and view in Gallery mode.
Steps to Service and Repair RV Water Heater
Follow these steps to troubleshoot electric RV water heater problems, and replace electrical parts to repair the water heater when it is no longer doing its job. While your at it, perform the regular water heater servicing that is likely long overdue in most RVs.
- Drain and rinse water heater tank
- Replace RV water heater anode
- Replace electric water heater element
- Diagnose faulty water heater thermostat
- Replace thermostat switch
- Investigate and repair faulty power switch
1. Maintain your RV water heater with regular servicing.
Turn off power to your water heater. Make sure both the gas and electric switches are in the OFF position, and wait a while for water to cool down.
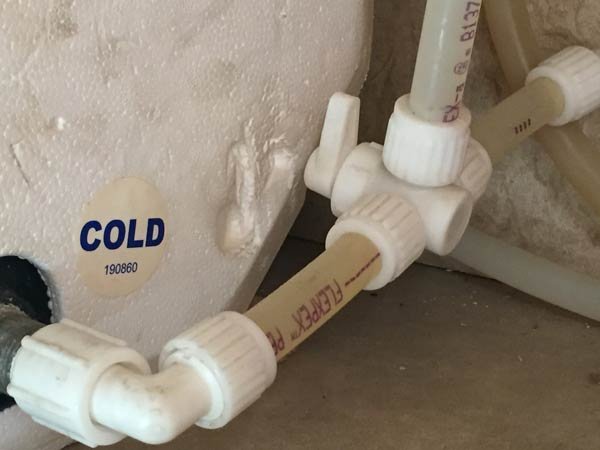
Find the water heater bypass valve, usually located inside the RV behind the heater. Turn the valve to prevent water from entering the tank. This will also allow you to use (cold) water while you perform your service and repairs.

Remove the vented panel to access the water from outside your RV. Flip the lever on the pressure release valve to – yup, you got it – release pressure from inside the tank. WARNING: This water may be hot!
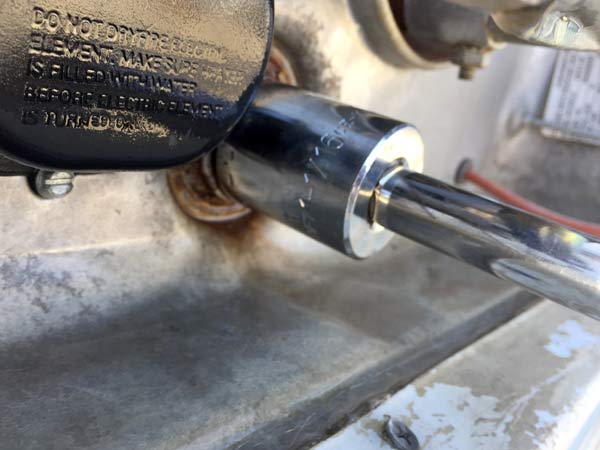
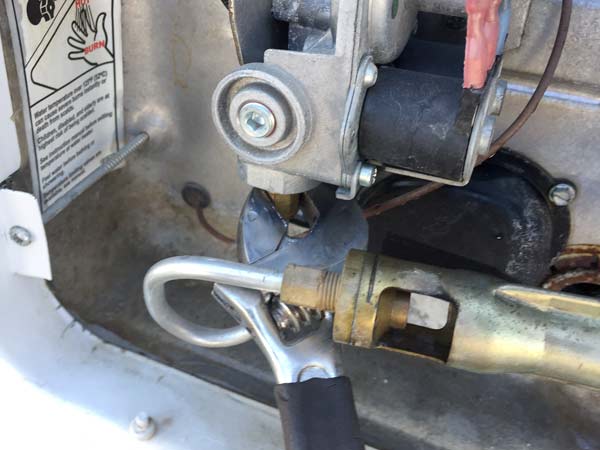
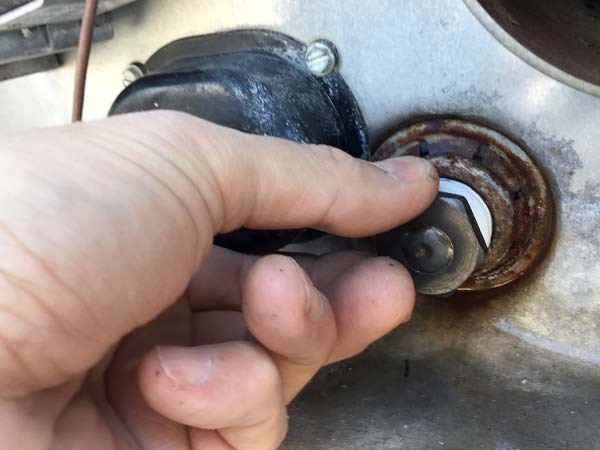
Remove the water heater anode rod to drain water from the tank. You will need a 1? 1/16″ socket with wrench extension. Read my previous post about how to replace the RV water heater anode and why, for details about what the anode does – and why you need to replace it periodically.
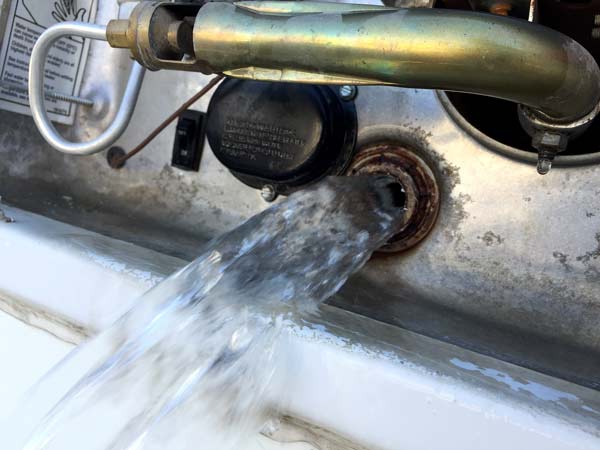 Allow all water to drain from tank. See prior note about potentially hot water. Do this step before removing any of the electrical component covers I discuss next.
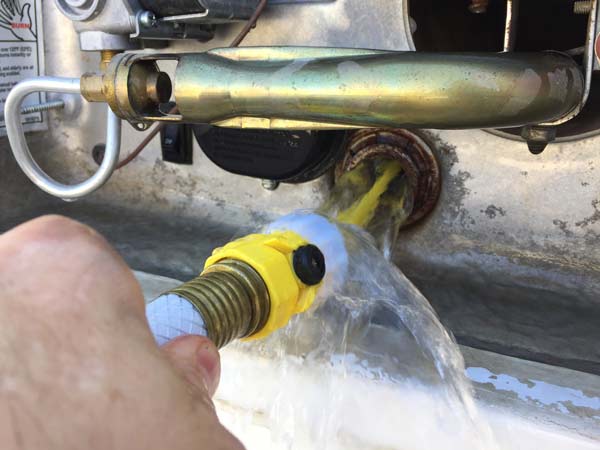
Attach a water heater tank rinsing wand to the end of your hose. Insert the wand and turn on the water to thoroughly rinse the tank and remove sediment that collects at the bottom of RV water heater. I find it works best to rotate the wand 360 degrees while holding it all the way in, then pushing it in and it out to allow built up water pressure to carry debris away. Allow all water to drain out and clean anode opening threads of any debris.
2. Replace Electric Water Heater Element ?
NOTE: To access the electric water heater element, you will need to remove the gas supply manifold and burner assembly. This component contains very small parts which are easily lost or reinserted incorrectly when disassembled. To avoid this, remove the entire assembly intact. For more information and detailed steps, see my prior post about how to replace the electric water heater element.

Read on for electrical component diagnosis steps and download a detailed service manual and troubleshooting guide for the Suburban RV water heater.?
Ensure that gas and electric power switches are turned off. Loosen retainer nut at end of gas supply manifold tubing.
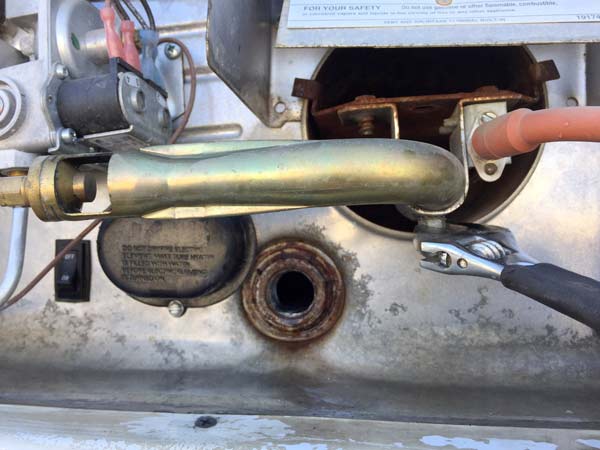
Remove nut holding burner assembly in place.

Loosely replace nut on burner retainer bolt so you don’t lose it, and set assembly aside.?

Remove cover to access electric water heater element, using a flathead screwdriver.
Use a Phillips screwdriver to disconnect wiring from water heater element.?

To remove the element, you will need a Hot Water Heater Element Wrench. Place the socket over the element head. Insert a screwdriver into the holes at the end of the wrench. Turn counter clockwise to remove the element. (Clockwise to tighten the new element.)

Use silicon plumber’s tape to ensure a tight seal on threads for both the water heater element and anode.
Replace the anode rod and element. Re-connect the AC power wires to the water heater element. It does not matter which color wire connects to which screw. Do not over-tighten, one quarter turn past hand tight should suffice. Replace cover to seal electric heater element.
DOWNLOAD: Suburban RV Water Heater Troubleshooting Guide and Repair Manual
This Suburban water heater repair manual is very helpful for troubleshooting the electrical power circuit to diagnose potential problems. Follow the steps it contains for tracing power through the system to locate any short or break that may be causing the element to not heat up.
NOTE: Do not “dry fire” the electric water heater element. Ensure that the tank is filled with water before turning the power on. I didn’t bother doing this because I was replacing the element anyway, and I only momentarily turned on the power to test the components.
3. Troubleshoot Electric Water Heater and Replace Thermostat
NOT PICTURED: Test for proper voltage on each side of the water heater element by touching one probe of your multimeter to each screw, while touching the other to common ground.
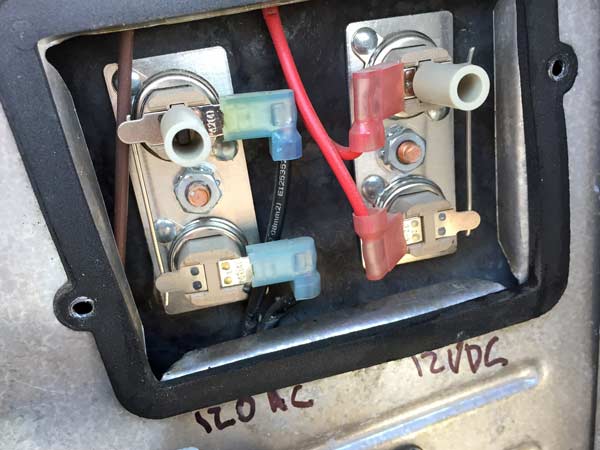
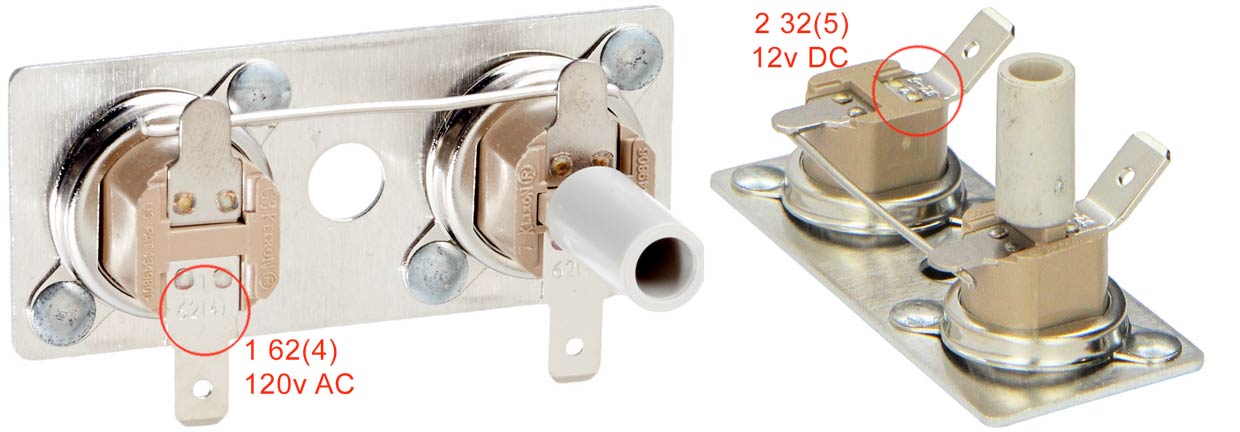
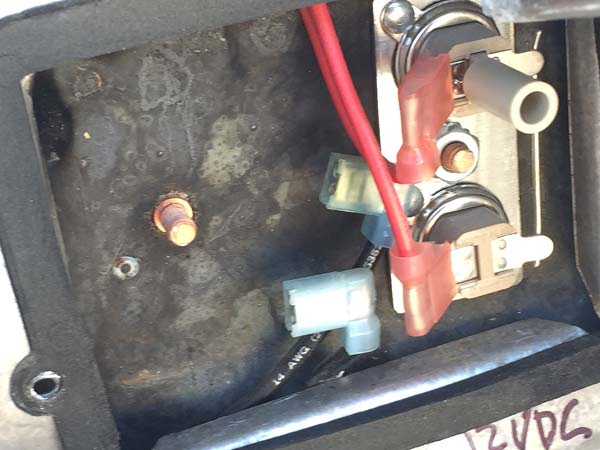
Remove the square black cover to expose the RV water heater thermostat switches. These components prevent overheating by breaking the electrical circuit. Damage may not necessarily be visible. The two thermostats are also nearly identical. unless you look very closely at the numbers stamped on them.
For my reference, I marked which one was the 120 AC thermostat (Left), and which one was the 12v DC switch (Right). For your convenience I’ve confirmed the following part numbers:
Be aware that the position of your thermostat switches may differ. Set your meter to DC for testing voltage to both sides of the 12v DC thermostat.
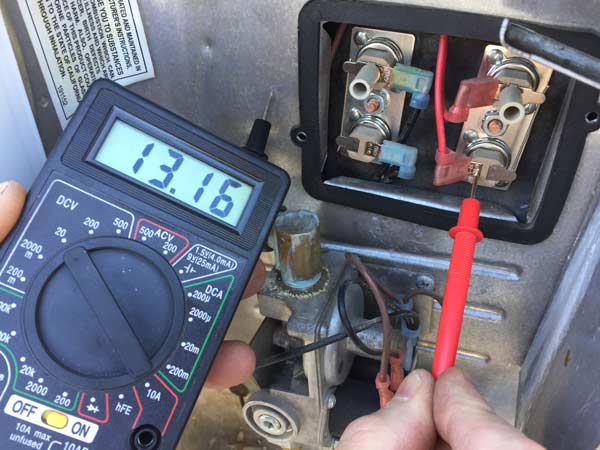
Set your meter to the AC setting for testing voltage to both sides of the 120v AC thermostat. Please note that a good voltage reading may not necessarily mean the switch is still good. I read proper voltage for both of our switches. Since I had the part, I replaced it anyway. Especially after what happened next.
WARNING: Do not short thermostat when testing switch voltage!

Taking a second reading, just to make sure both ends of the thermostat were showing adequate voltage, I accidentally touched the probe of my multimeter to the base of the switch, while still contacting the overlimit sensor tab – or whatever you call that business end of the thermostat. 😮 Don’t do this.
So…this is what a faulty thermostat may look like. 😕

And the corresponding voltage drop would be obvious.
REMINDER: Ensure power switch is turned off.
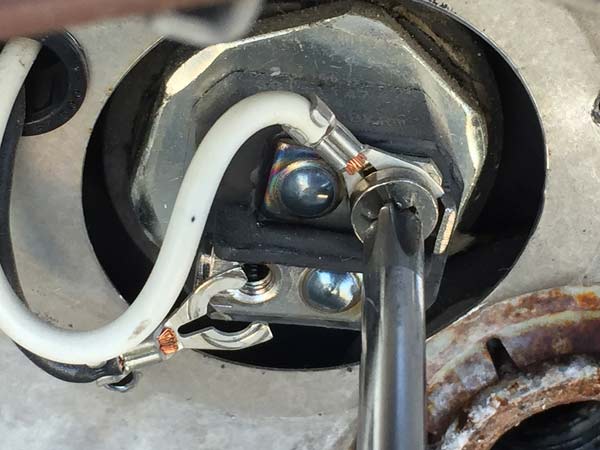
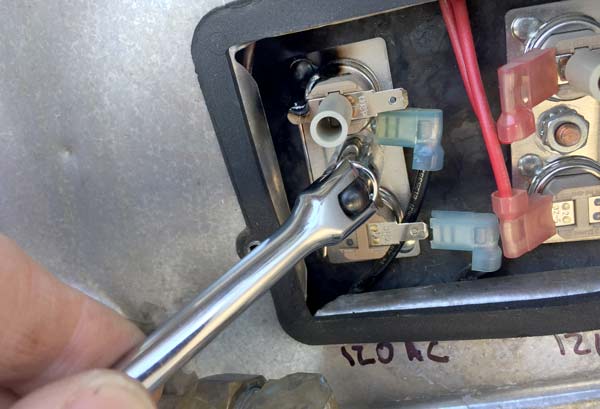
Remove wiring clips from switch connector tabs. Use 3/8″ socket to remove retainer nut from thermostat base connector post.
Place new 120v thermostat switch assembly onto post and reattach wiring connectors.
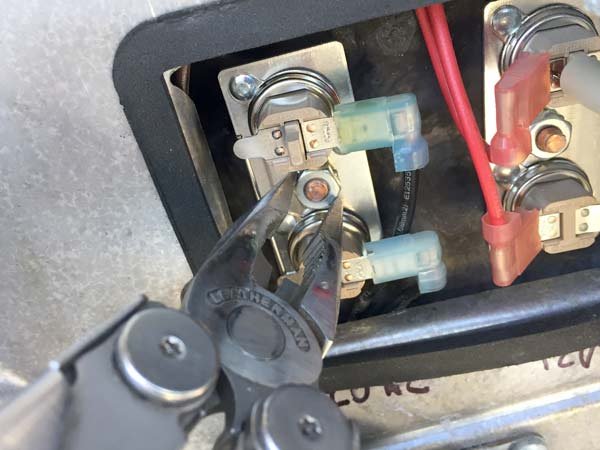
If you do not have a small enough socket wrench, grip the small retainer nut with your Trusty Leatherman. WARNING: That small nut could easily slip out of the socket and fall down into the opening and inside the water heater casing to be lost forever Luckily, I am not speaking from experience here.
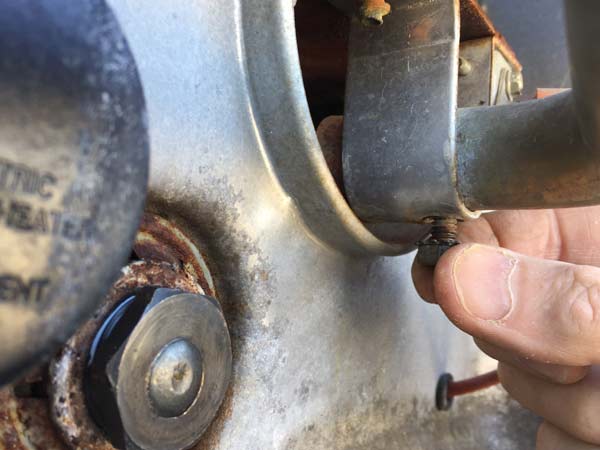
After replacing the cover to seal up electrical components, don’t forget to reattach the gas manifold and burner assembly you set aside earlier. Position the manifold tubing in position and insert the burner retainer bolt in place.

Hand tighten the manifold retainer nut. Tighten both nuts.
4. Inspect and Repair Faulty Water Heater Switch
Now, I had a number of things that could have been going on with our cold water heater. It was likely a bad electric heating element. The AC thermostat switch may have been bad. It certainly was after I shorted it out. I got a good voltage reading at the AC wall switch inside the rig. But see what I discovered when I investigated the last remaining electrical system component.
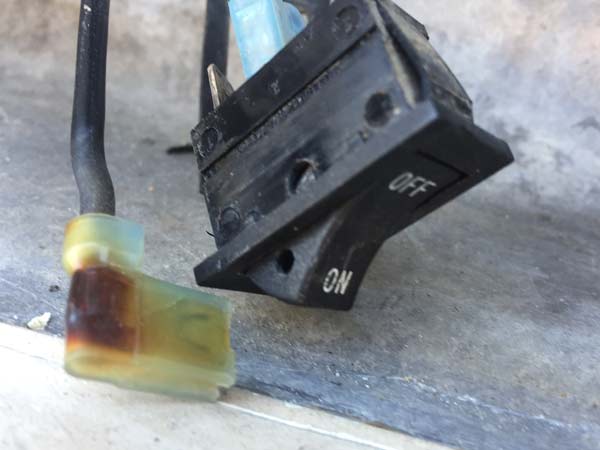
Since I was checking the whole electrical system anyway, I decided to test the toggle switch located on the front of the water heater. I was glad I did.

This small switch can be easily pried loose with a small flathead screwdriver. I discovered one of the connectors was fried. Whether or not this was causing our problem, it needed to be fixed. A good selection of connectors and fuses, or a through electrical connection kit, is a good thing for any RVer to have for just this very reason!
After cutting off and replacing the damaged blade connector and reinserting the switch, it was time for the moment of truth…
Open the pressure release valve on your water heater. Turn the bypass valve inside to allow water to flow back into the tank. Let water fill the tank until until it comes out the release valve. Shut the pressure release valve. Turn on electrical power to the water heater, and wait.
Within an hour, we once again had Hot Water! 🙂
Parts Needed to Service and Repair RV Water Heater
water heater tank rinsing wand
Hot Water Heater Element Wrench
Suburban 120v T-Stat/Limit Switch 232306
12v DC Suburban 232282 Switch Assembly?
Related Reading to Repair RV Water Heater:
Note to Self: Check Water Heater Anode
How To Service RV Water Heater, And Why
How I Fought my RV Water Heater, And Won!
I had the same problem with my RV water heater. I found that the ground wire was not connected to the battery. I re-connected the ground wire and it worked fine.
I love an easy fix!
Jim,
Can you tell me a part number for the water heater electric switch (rocker switch)? I have a Forest River Vengeance Touring Edition Toy Hauler, but the face of the switch looks the same as the switch above.
Thanks,
Virgil
Yep, it’s likely the same switch: Suburban 232259
We have a suburban water heater . I want to run off electricity and not gas . No matter what the on /off switch is positioned , it runs off propane.
There are two separate power switches, one for 110v electric and the other for propane.
Our water heater in our RV stopped heating last year. We want to be sure to fix it before we take it out in the spring since we have a small child and a baby. We read your information and found it very helpful. When we found out that we had to take out the gas supply manifold and burner to replace the electric water heater element, we decided to call on a repair specialist. You have great information here, but a MObile RV repair company might have more time to give to this task than we have.
Electrical & propane Atwood hot water heater – no heating water issues either way but I just moved rv & now notice the plug ending is way to hot when plugged up to electric. For safety now I’m only using propane side but want my Electrical option back, suggestions?
Less then year ago I replaced:
Anode rod, heating element, outside on & off switch, rinsed out tank & put it on it’s own breaker instead of the main 15/15 breaker switched main to a 30amp & water heater on its own single now. And had no issues using either options until this last move.
Thanks for any suggestions!
Sounds more like a voltage regulation issue than something with the water heater itself. If it didn’t happen before upping the amperage of the breaker, that may be the cause.
Greetings! I have a 2006 Dynamax Isata 250 touring edition and the hot water heater will not light. It is just a gas hot water heater it is a suburban. And I just don’t know quite what to do for it or with it is there a place for me to start and things for me to do that I can get this going again?
Thanks John Smith 315 729 2450
Could be anything from a bad thermocouple, loose starter wire, low voltage, or blown fuse, to bad gas line. Start with with the simple things. Check the fuse and voltage, ensure that gas is flowing. Try manual lighting. Replace thermocouple…godd luck!
I have the same problem as Rodney. Replace heating element, switch, and have 119v to both ends of the thermostat, but as soon as I connect the power to the heating element there’s no power to too anything. What is the power box on the back side of the 12gal Suburban hot water heater. Any suggestions?
My Atwood TV water heater pilot light comes on the flames sensor lights then will not relight after it shuts back off could that be the gas valve thank you ricky
My water heater will not heat on elect but does fine on gas. I believe the problem is from me replacing the element and I put in one that should have been on a 20A breaker instead of a 15A. I have replaced it with the correct one but still wont work on electric. Any idea what I screwed up?
Hey Jeff, Jim says it could be as simple as a blown fuse when you had the wrong element in there. Start with simple. Good luck!
I also have the same problem. My hot water tank will only work on gas and not electric. I have never done anything with it, like replacing anything. What can I do
Sorry to hear that Gail. You can follow the troubleshooting steps I’ve provided in this post. Start by checking your breaker switch. Make sure the switch on the water heater is on…then follow the steps I describe for checking and replacing the thermostat switch and heating element. Good luck!
Blue dog rv tech hear with 20 +years working on rv #1 kill power to hot water tank so no 120v goes to it shore power or curcuit breaker on then back side of your atwood hot water tank find the black box inside is a relay that when switch is turn on to ele relay send 12v to it to open to allow it to heat on 120v this needs to be replaced.
FYI I would of continuity tested heating element with wire off of it for short then ohm tested for resistance range of good element is between 10.000ohms and 15.000 ohms
#2 if your hot water lacks getting hot on gas and does not reach a temp of 125 ish then yes hot water temp sensor doe need replaced.
Help save you a buck or 2
Hello. I have an 03 shasta. The hot water doesn’t last in the shower long enough. Any ideas sir. Thanks.
My first step would be to replace the thermostat and/or heating element, as I describe above. Change the anode and give the tank a good rinse while your at it. Easy enough fixes that should do the trick.
Hey
We have a Cardinal 5th wheel RV, 5 years old, minimal use. Our hot water heater tank is heating. We get hot water off the pressure release valve but it barely gets warm at the taps inside.
We replaced the anode recently, waters clean and since this has started, we replaced the check valve.
The water pressure is consistant from cold to hot positions.
Cold showers are the bunk! Please advise.
Thanks,
Mike & Sally
(So. Cal conditions)
I would replace the thermostat and/or heating element, as I describe above. Easy enough fixes that should do the trick!
Blue dog rv tech.
Sounds to be 1.of 3 issue
1 check valve on back side of hot water tank hot water line out may be plugged with sentiment
2 airarator may be plugged
3 check to see if you havea low flow high presser shower head.
Hi, I have replaced all the parts, heating element, switch, and 120 volt thermostat switch assembly. As soon as I put everything back together I lose power to the heating element, any ideas.
Bummer. Trace the power all the way from the source, to determine where the fault is.
Hi, I have a atwood hot water tank in my coach… wont work.. replace heating element, thermostat heating element on the outside, switch no the dash board…. check the om reading, it was good, check the wiering in behind tank to make sure we have power…. it’s good. It will run on propane… but not electric…. do you have any ideas on were to go with this. Thank you
All I can suggest is to trace the power from the source to find where the fault is. Good luck!
You can test the resistance of the element to see if it is bad. With the electrical connections removed from the element, set meter to ohm setting. Touch one probe to one connection of the element and the other probe to the other connection of the element. This will send a small amount of juice from the meter through the element and read how much resistance to flow the electrical current encounters. A good element will have a very little resistance (0.1 to about 0.4). No resistance means the circuit is open and the element no good. A lot of resistance also indicates a bad element. Touch the two meter probes together before and then after testing the element to make sure the meter is working.
Great post!
Thanks for the great feedback!
I have replaced the on off electrical two times,each time the water heater works for a period of time.It stops working I tried to move the switch to the off position,it is seized.Can I eliminate the switch and control the on off from main electrical panel. Thank you
I personally wouldn’t recommend such a hack. If the switch is faulty, you put yourself at risk by delivering power to it.
So what I took away from that is you might as well buy all the replacement parts, because once you start taking apart the water heater you don’t want to find the source of the problem and realize you don’t have the part you need! Have you guys considered switching to a tankless heater?
Roger that. As a good boy scout, I believe it is always best to be prepared. And
whenif we ever need to replace the entire water heater, we’ll definitely consider going tankless.Thank you for the excellent guide!
Hopefully you can help me. I’m in the road currently without many tools and my water doesn’t get hot anymore from electricity. I tried to just turn the switch in and of but the switch seems to be broken? I can’t even put it on off. Have you ever encountered an issue like this?
Not personally, but if the switch itself is broken, that’s a relatively simple fix! All you should need is a screwdriver, and a new rocker switch.