Why Does My RV Water Heater Make Noise?
Does the water heater in your RV make a high pitched noise? Does it whistle when you have the electric water heater on? If so, it may be time to replace the electric heating element.
Corrosion can build up on the element causing it to make noise when it gets hot. Replacing the element can be easily done following the simple steps outlined below. With just a couple cheap tools, you can save yourself from an expensive trip to the RV dealer or repair shop.
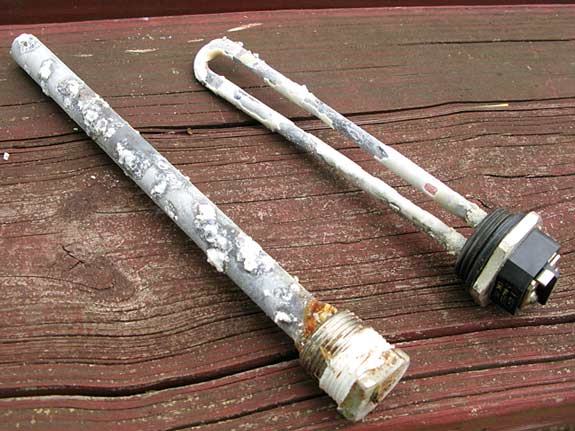
While your at it, this is a good time to replace the anode and flush debris* out of the water heater too. The anode helps prevent corrosion from building up in the first place, and should be replaced annually depending on use.
*Another cause for a noisy water heater—either on gas or electric—can be a plugged check valve. Debris can get stuck in the hot water outlet, creating a whistling noise.

How To Replace RV Water Heater Element and Anode

First, you will need a few basic tools:
[unordered_list style=”tick”]
- Screwdrivers (Philips and Flat)
- Small Crescent Wrench
- 1 1/16″ Socket Wrench
- Teflon Tape
- Hose and Access to Water
[/unordered_list]
Note: The Anode in our Suburban 10 gallon water heater requires the 1 1/16″ socket. The size for your water heater may be different.

Every full-time RVer should also have the following specialty tools on hand for servicing the water heater:
[unordered_list style=”tick”]
[/unordered_list]
Step by Step Electric Element and Anode Replacement:
1. Shut off water supply to water heater.
Locate cold water supply at bottom of water heater, usually inside the RV. Most RVs are equipped with a bypass tee valve used for winterizing the plumbing. Turn the valve to shut off water supply.

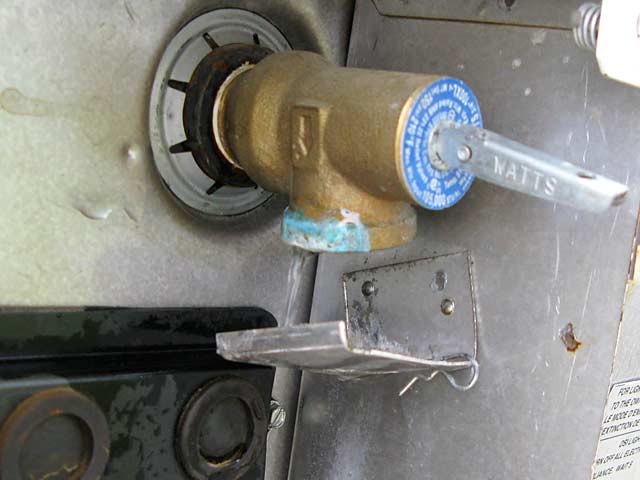
2. Release pressure from water heater.
Open the relief valve in the exterior water heater access compartment to release any pressure.
[box type=”alert” style=”rounded” border=”full”]CAUTION: Water May Be Hot![/box]
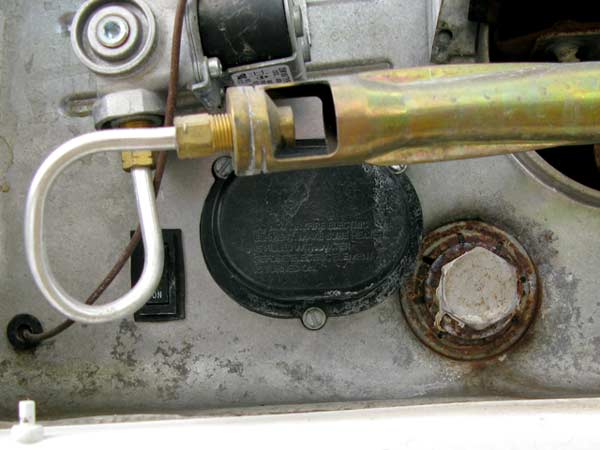
3. Remove gas heater manifold tubing.
To access the electric heating element, you may need to remove the gas heater manifold tubing and burner assembly.
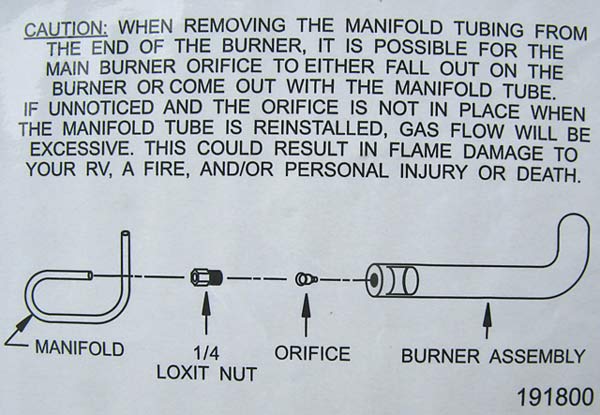
[box type=”alert” style=”rounded” border=”full”]CAUTION: Do Not Lose Small Parts![/box]
3b. Keep all manifold parts together!
Be careful not to drop or misplace the small gas burner orifice when disassembling the manifold. It must be reassembled the same way to function properly.
4. Remove anode and drain water heater.
Use the socket wrench to remove the anode rod, which also serves as a drain plug.
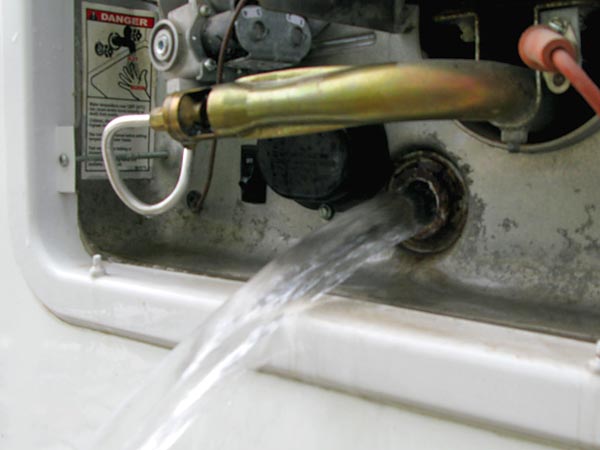
I know, this photo shows the burner in place. If only replacing anode, the burner may not need to be removed.
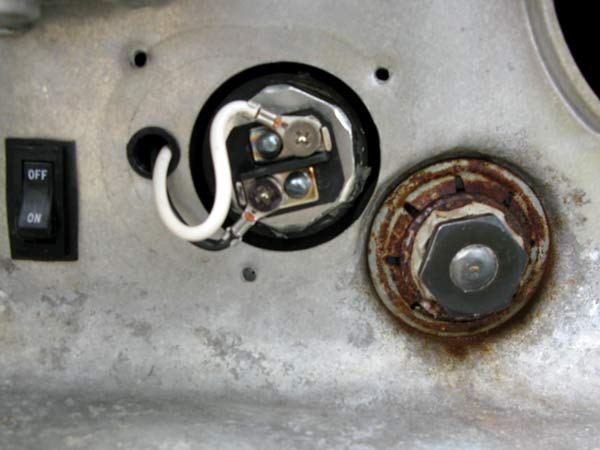
5. Disconnect electric heating element.
Remove the black cap covering the element and disconnect the two wires. Be sure to turn off all water heater switches or disconnect from power first. (If concerned about reconnecting wires properly, mark location of black wire with a Sharpie. See step 8b for details.)
[box type=”alert” style=”rounded” border=”full”]CAUTION: Turn Off Power First![/box]

6. Remove element.
Use the Water Heater Element Wrench by sliding the hexagonal end onto the element nut. Insert a screwdriver into the two holes at the end and turn it counter clockwise to remove. Be careful to move wires out of the way first.

7. Rinse water heater.
Attach the RV Water Heater Rinse Nozzle to your hose and use it to thoroughly rinse out the tank. Allow the tank to fill up a bit and let all the water flow out a few times. Move the wand around to reach all corners of the tank.

8. Replace new element and anode.
Apply Teflon tape to the threads of the anode and element to ensure a good seal. Replace each and tighten securely with the appropriate wrench. Once secured, reattach the wires to the electric element.
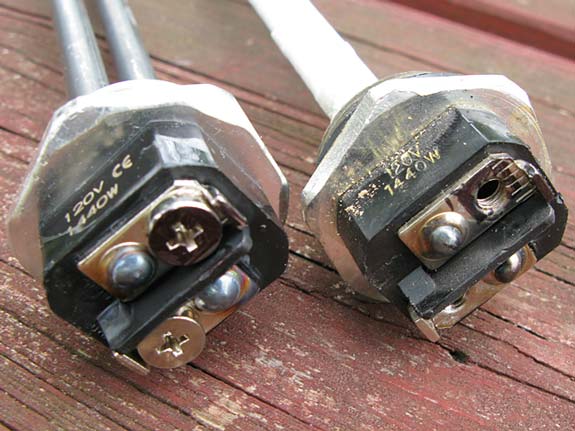
8b. Does it matter which wires attach where?
Probably not. But just in case, I compared the new element to my old one and marked the location of the black wire.
9. Re-attach the black cover over the electric heating element.
10. Re-connect gas manifold tubing and burner assembly.
11. Open cold water supply to water heater and fill tank.
12. Test for leaks and hot water!
Open a hot water faucet until all air is removed from tank and water is flowing. Test gas water heater to ensure flame burns steadily. (Note: Flame may need to combust a few times to dry out components before it remains lit.) Be sure to turn all switches back on for electric water heater, including the one in exterior compartment if present. Allow ample time for water to heat up and check for leaks in outside compartment around both the electric heating element and anode rod.
Hopefully your water heater will now operate quietly. If not, consider changing the check valve. But that is another blog post altogether…
Did you find this helpful?
Any Questions? Leave a comment if you have tips of your own. Subscribe here to be notified of future blog posts.
I just acquired a used but recent model (2018) travel trailer and decided to check the anode. All that was left was the diameter of a coat hanger. Should have been done a long time ago!
Going to have to come back to this one. I’ve heard it’s also good to just drain your heater every now and then to clean it out. Still haven’t done that since we have owned it.
Yup…every year or so, I try to replace the anode which is also the drain plug.