To fix RV furnace problems, follow these simple steps for troubleshooting a Suburban furnace and replacing the parts that commonly go bad. This post is for anyone who searches “how to fix RV furnace” and wants to save the cost of an expensive repair at the shop. Spoiler alert: It’s not as difficult a project as you may think. Read on for simple steps and important troubleshooting tips when your RV furnace won’t work.

First we’ll determine why your RV furnace won’t work. Then we’ll discuss which broken RV furnace parts can and should be replaced. And to save money, we’ll identify in which order parts should be replaced to fix RV furnace problems. For starters, we need to ask Why the RV furnace won’t work. What are the symptoms of your broken RV furnace? If you already know, use these links and jump to the section with tips and photos to help fix RV furnace problems in your rig.
7 Simple Steps to Fix RV Furnace Problems
1. Why RV Furnace Won’t Work?
2. Troubleshooting RV Furnace Problems
3. Important Safety Tips for Furnace Removal
4. How to Replace RV Furnace Limit Switch
5. Replace RV Furnace Sail Switch
6. How to Replace RV Furnace Control Module Board
7. When to Replace RV Furnace Gas Valve & Igniter
8. Bonus Tip & Fun Fact!
Ask Yourself: Why RV Furnace Won’t Work
What are the symptoms of your broken RV furnace? Does your thermostat switch activate the furnace? Does the blower even come on? Or, does the furnace blow air, but it never heats up? Can you hear the igniter click? (Hint: I couldn’t hear ours. However, that doesn’t mean it wasn’t working. But we’ll get to that.) Answering these questions will help you replace or fix RV furnace parts that may be causing the problems you face. And, those problems may be different than ours. Challenges, never problems, I say. But then, I digress…let me explain what happened to us and then I’ll provide the steps for your furnace repair project. (Or projects.)
Yes, it’s nearly 100 degrees out as I write this. But during the crazy Oregon Spring weather we had some rather chilly mornings. One day, our RV furnace stopped working. Or rather, it started working. Then it stopped. When I switched on the thermostat, the furnace blower came on. However, the air never got hot. Then the blower shut off within about ten minutes. Technically, this means the furnace was indeed working. It was doing it’s job by shutting itself off. Therefore, exactly why our RV furnace stopped working became my next problem challenge.
NOTE: These repair tips are for the Suburban SF-30 RV Furnace installed in our 2010 Arctic Fox fifth wheel. Suburban and Atwood are the most common RV Furnaces. The operating procedure and troubleshooting steps are similar for both. Contact your RV manufacturer if you do not know which RV furnace stopped working in your rig.
Suburban RV Furnace Repair Part Numbers
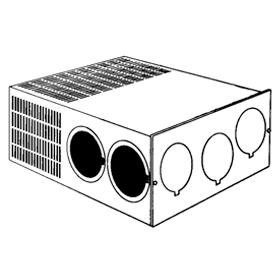

How an RV Furnace Works*
- The thermostat calls for heat via the room temperature setting and/or switch being turned on.
- Control module board will sense if the sail switch is open and energize the blower.
- The blower will purge air for 15? seconds, then the module board will confirm the sail switch is closed. (It acts like a sail, being activated by the blower.)
- Control module will energize the gas valve and enable the high voltage spark output to the electrode for 7 seconds of ignition time.
- If the flame sensor verifies successful lighting of the main burner flame, sparking is terminated and the gas valve and blower outputs will remain energized.
- When no flame is sensed after seven seconds, two additional 15 second purge and ignition cycles will be repeated before system shutdown.
- Finally, if during the heating cycle, the limit switch circuit opens for 5 minutes, the module board will go into lock out and shut down the blower motor requiring thermostat reset for the furnace to operate
*Summary from Sequence of Operation for Fan Control Module Board in the Suburban RV Furnaces Service Manual.
Top 3 Failing RV Furnace Parts
“They” say the most common parts to fail which cause you to fix RV furnace problems are the:
However, these also happen to be the most expensive RV furnace parts to replace. We decided to try replacing the least expensive parts first. The Limit switch is cheapest, and easiest part to replace. That was simple. Next, I replaced the sail switch, hoping for a $20 fix. When that failed to fix RV furnace problems for us, I broke down and bought a new control module board.
Do yourself a favor. Believe “them” and replace all the parts at once to rebuild your RV furnace. As a result, you won’t have to remove your furnace four times, like I did. At least I now have a firm enough understanding of the typical RV furnace repair project ? and enough photos ??to share these simple steps and troubleshooting tips with you!
Troubleshooting Steps for Suburban RV Furnace Repair
Below are detailed steps for replacing the parts required to fix our furnace. Your steps may be different based on the detailed troubleshooting guide provided in the following Suburban RV furnace documentation.
Suburban RV Furnaces Service Manual
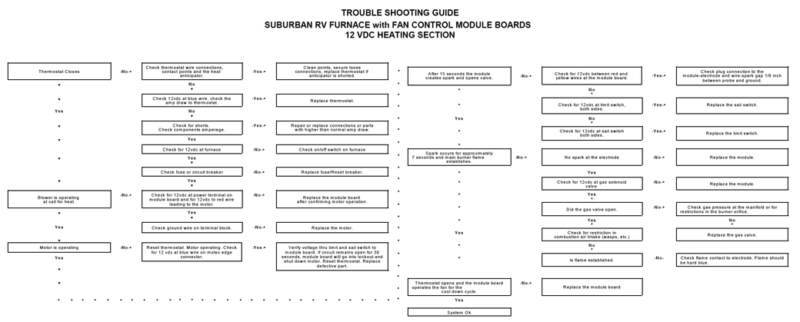
RV Furnace Trouble Shooting Guide
How to Safely Remove and Repair RV Furnace
Follow a few simple procedures to ensure your RV furnace repair is safe and easy.

Important RV Furnace Repair Tips
- Shut off gas at the propane tank before proceeding with any furnace repair!
- Bleed any gas from the lines by igniting a burner on the stove until it goes out on its own.
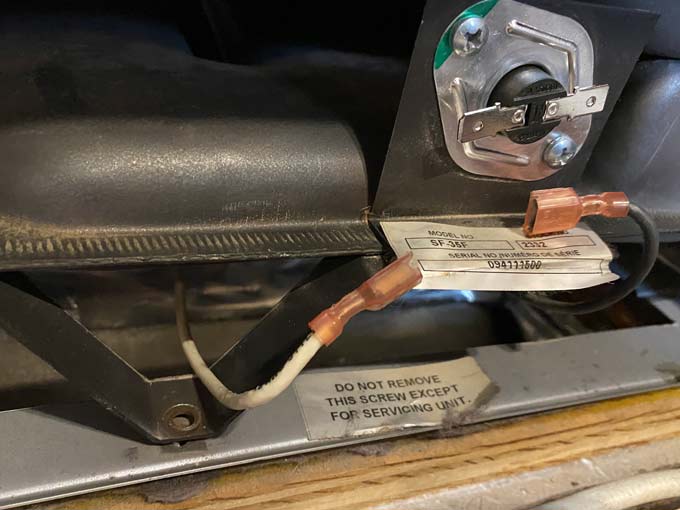
- Disconnect gas line and remove centered mounting bracket screw. (This is the only screw that needs to be removed.)
- Identify and ensure there is enough slack in all furnace wiring. As a result, you’ll be able to pull the furnace assembly out without damaging or disconnecting any wires.
- If the wires are connected with wire nuts, make sure they do not get caught up on the metal furnace housing while pulling out the assembly.
- Furnace burner edges can be sharp, where gloves or be careful not to cut your fingers.
- Test for voltage according to your symptoms using the troubleshooting guide provided above. Or, replace commonly failed parts following the steps below.
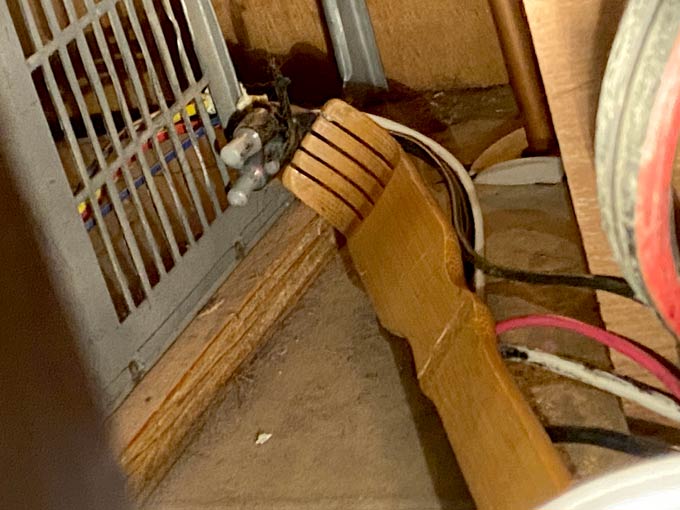
NOTE: The wires leading to our furnace were connected with a bundle of wire nuts at one point. This caught on the furnace housing while I was pulling out the burner assembly. Luckily, I noticed this in time before pulling to hard. Therefore, I accessed the side of the furnace from a nearby grate for our converter. Subsequently, by reaching in with a back-scratcher, I was able to guide the wire nuts inside the metal opening without damaging any wires.
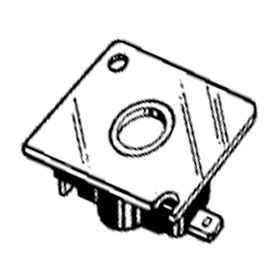
Replace Limit Switch to Fix RV Furnace
Replacing the limit switch is the easiest and cheapest way to attempt your RV furnace repair. However, to properly test voltage coming from the limit switch, you may need to remove the furnace assembly. As a result, since it is mounted on the front of the unit, you do not need to remove the furnace to replace the limit switch.
To replace RV Furnace Limit Switch:
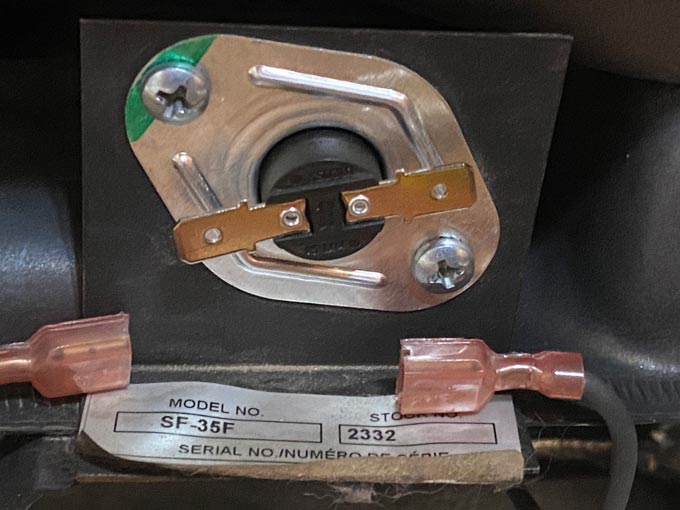
- Remove vented grate to access furnace front.
- Take front panel off RV Furnace housing.
- Disconnect leads from limit switch.
- Remove mounting screws.
- Replace with new Suburban 232504 Limit Switch and connect leads.
- Put front panel and access grate back in place.
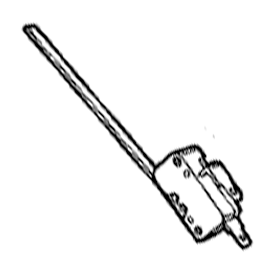
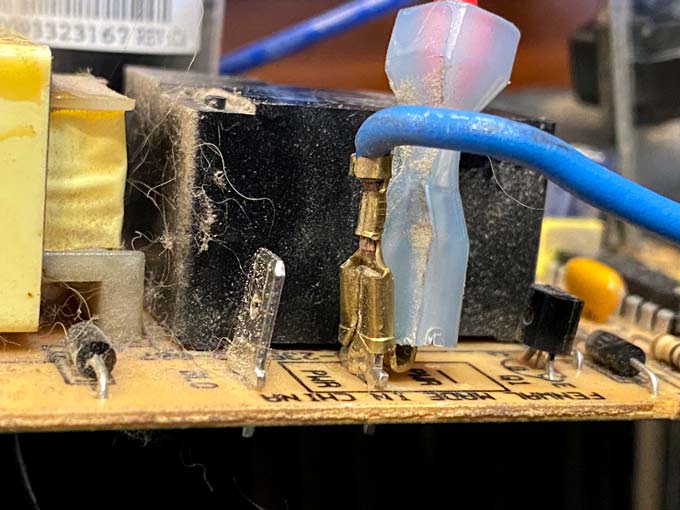
Replace Sail Switch to Fix RV Furnace
The sail switch acts as a sail, closing the circuit when air from the furnace blower moves the arm connected to the switch. This switch may fail if it is physically obstructed by build-up of dirt and dust-bunnies. Otherwise, the contacts may become corroded. Or, the sail may break if struck by the blower fan blades. Luckily, the Suburban 230509 Sail Switch is inexpensive. Also, it is easy to replace, once you know where to find it!
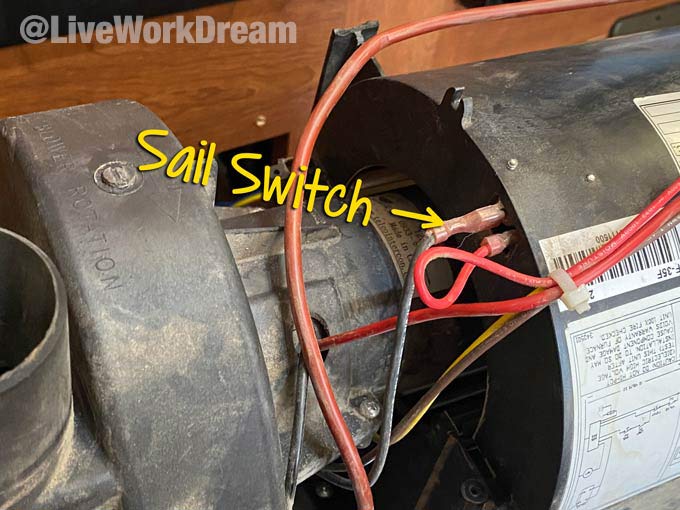
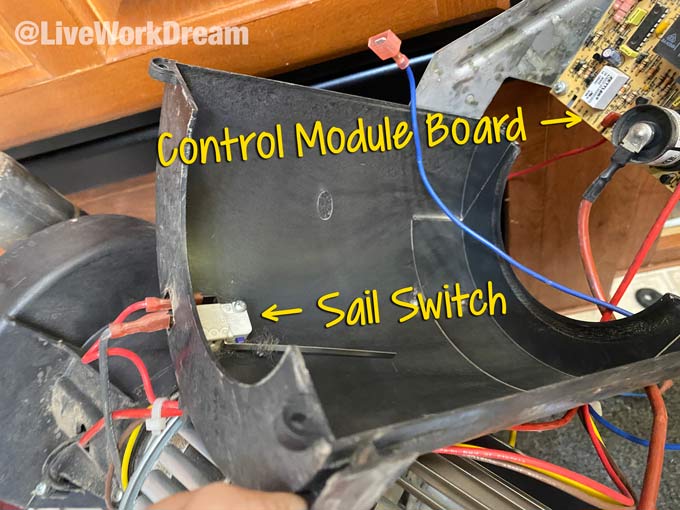
Where is the Suburban furnace sail switch?
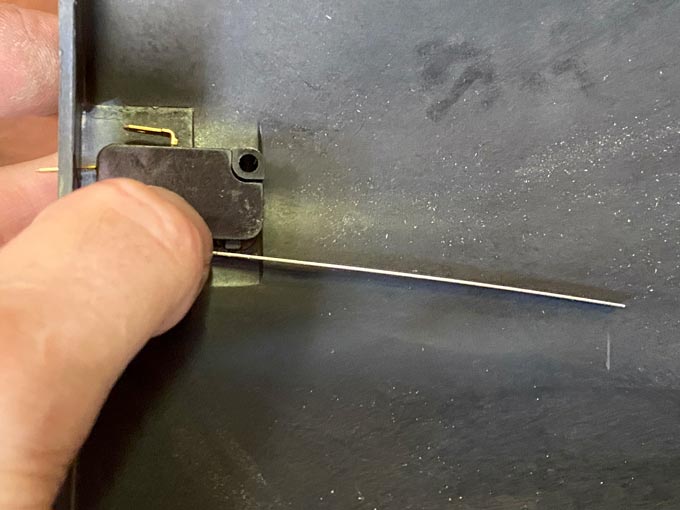
The sail switch is a small switch assembly with two contacts, and a long flat metal strip (“sail”) attached. It is located inside the blower housing. This switch is attached to the blower cover with two screws from the inside. Red and black wires powering the sail switch connect from outside the cover, at the rear of the furnace.
NOTE: The Control Module Board is connected to a metal bracket attached to the plastic blower housing cover. Take care when handling, or remove the bracket in preparation for the next step to fix RV furnace problems.
To Replace Sail Switch
- Remove screws attaching the plastic cover to the blower housing.
- Be careful with wiring and control board as you turn cover over to access sail switch.
- Remove wires from the switch contact posts.
- Unscrew small mounting screws from switch assembly.
- Replace new sail switch and reconnect wiring.
At this point, you may wish to reassemble your furnace and hope that the $20 part fixed your problem. More likely than not, it did not. If your fluent in electronic troubleshooting, you can continue testing for voltage according to the troubleshooting guide provided above. Otherwise, believe “them” and follow the steps below. Next we’ll replace the control module board. After all, you already have everything torn apart. So, if you’re just researching this project, scroll up to purchase all the parts you need to fix RV furnace problems once and for all.
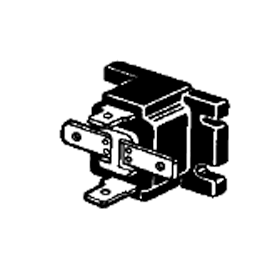
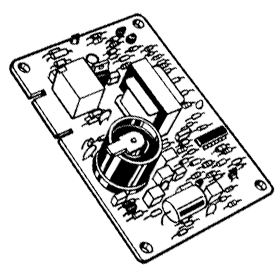
Replace Control Board to Fix RV Furnace
You will find many references to a bad control module board being the reason your RV furnace won’t work. If your symptoms are anything like ours were, this is likely the cause for your problem too. That’s because replacing the board fixed ours! Yes, it a more expensive part. However, replacing the board first can keep you from having to remove the furnace more than once. Otherwise, you’ll need to follow those troubleshooting steps to test for voltage everywhere in the system. And, you’ll need to remove the furnace to do that anyway. Therefore, if you like playing the odds, get yourself a new Suburban 520820 Control Module Board and follow these steps to install it.
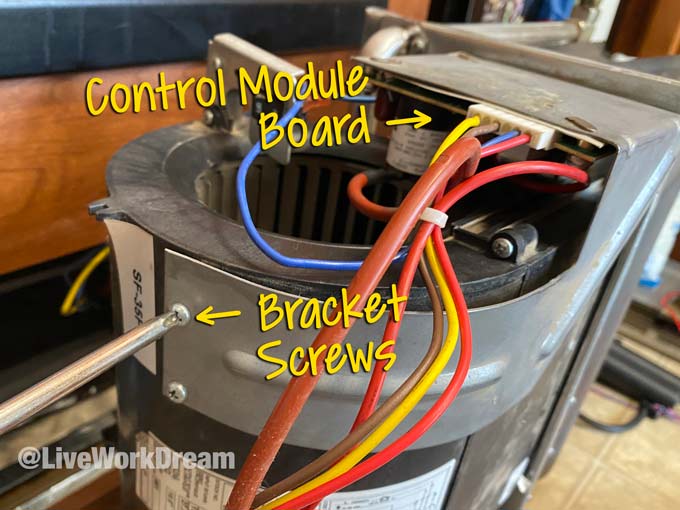

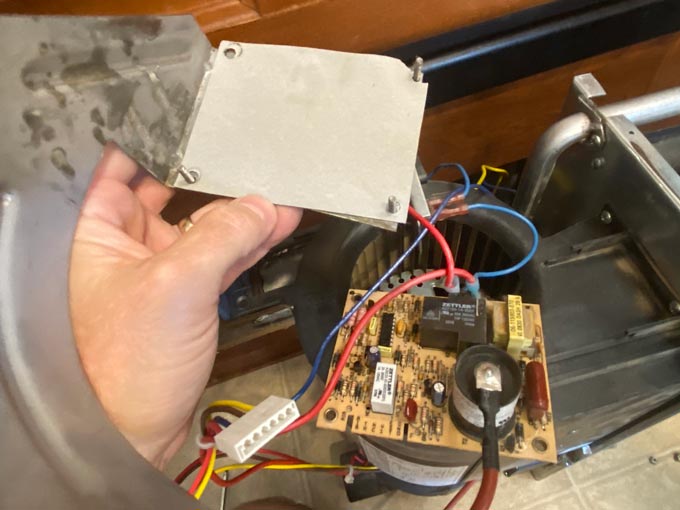
By now, you know the control module board is attached to a metal mounting bracket. In turn, that bracket is attached to the plastic blower housing cover. Need to also replace the sail switch at the same time? Follow the steps for removing the housing cover as described in the Sail Switch replacement instructions above. Otherwise, if you’ve confirmed the sail switch is good, there is no need to remove the blower cover. Next, replace the new board as follows.
TIPS: Ensure that thermostat is turned off, or switch off the blower motor. Remember to turn the blower switch back on! Identify and mark all wire locations. Or, remove and connect wires to same locations on new board one at a time.
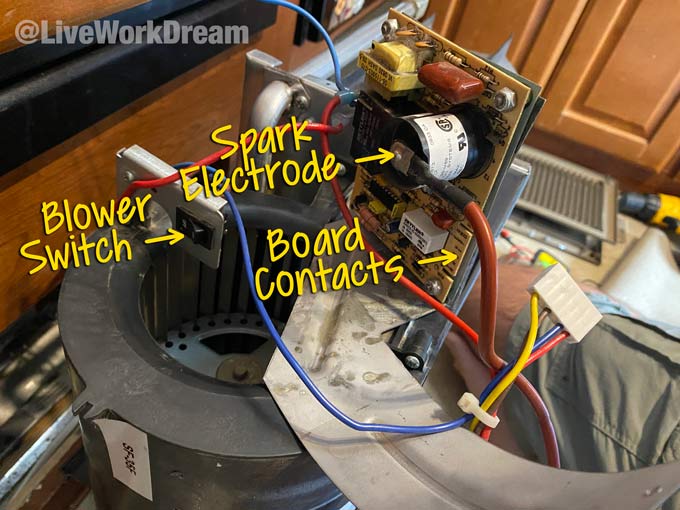
To Replace RV Furnace Control Module Board
- Remove screws attaching the metal bracket plastic cover to the blower housing.
- Disconnect 4-wire wiring harness from the board.
- Remove electrode from spark igniter relay.
- Disconnect remaining 3 wires from the 2 posts on the board. (Notice that one post connects two wires.)
- Unscrew nuts attaching board to bracket. (Don’t lose nuts! New board does not come with any.)
- Place new control module board onto the mounting posts, and gently tighten nuts.
- Reconnect all wiring to same locations as on old board.
- Reattach mounting bracket to blower housing cover.
Is Your RV Furnace Working?
Before you put everything back together, you can determine if your RV furnace repair is successful. Test for voltage to the gas control valve as described below, or trust “them” and reinstall your furnace. It is probably fixed now.

If you have no voltage reading to the gas valve, ensure that all wires are connected to the new control board properly. (Very low millivoltage does not count.) In addition, connect the limit switch wires. And finally, make sure that blower switch is on.
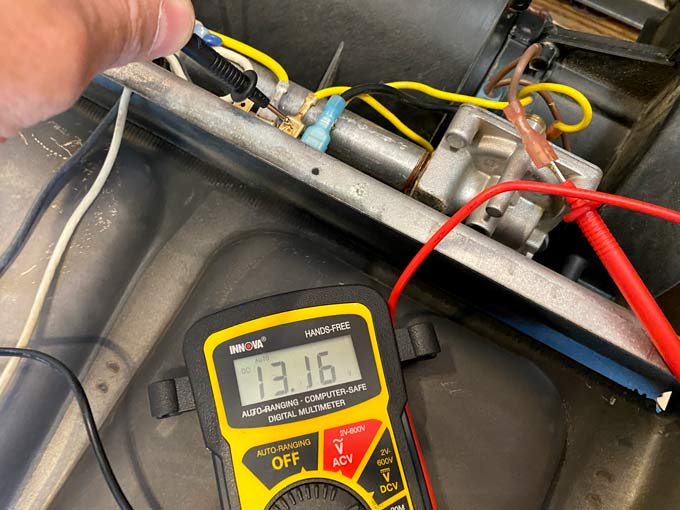
How To Test Voltage from Control Module Board
- Remove brown wire from positive contact post on gas valve.
- Disconnect yellow gas valve wire from negative contact bar.
- Set your handy digital multimeter to the DC Voltage (DCV) setting.
- Insert tester leads into the corresponding wire connectors.
With a reading of at least 10 volts, you know your new control board probably fixed your RV furnace problems. After reinstalling everything, there is only one remaining reason the RV furnace won’t work. A faulty gas valve…
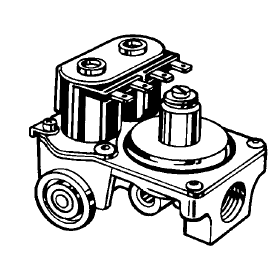
Install New Gas Control Valve to Fix RV Furnace
While you have your furnace removed, you can follow the troubleshooting steps provided to help determine if you have a bad gas valve. Confirm voltage is being sent to the gas valve as explained in the previous step. Then check for a spark during the ignition sequence by activating the furnace via the thermostat.

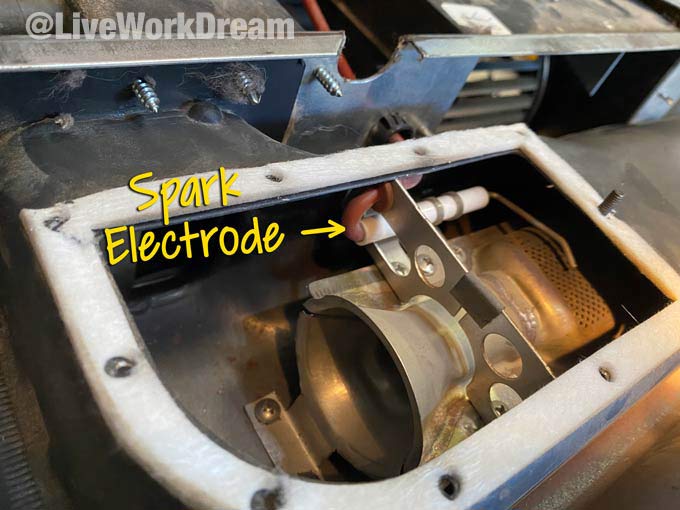
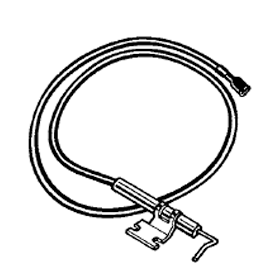
Obviously, with the furnace removed and gas disconnected the furnace will not ignite. But you can visually inspect the electrode inside the combustion chamber to confirm if a spark is present. Activate the furnace at the thermostat and look through the viewing window on top of the combustion chamber. Or, check for spark once you’ve removed the chamber cover. If necessary, follow these steps to replace the gas valve and/or electrode.
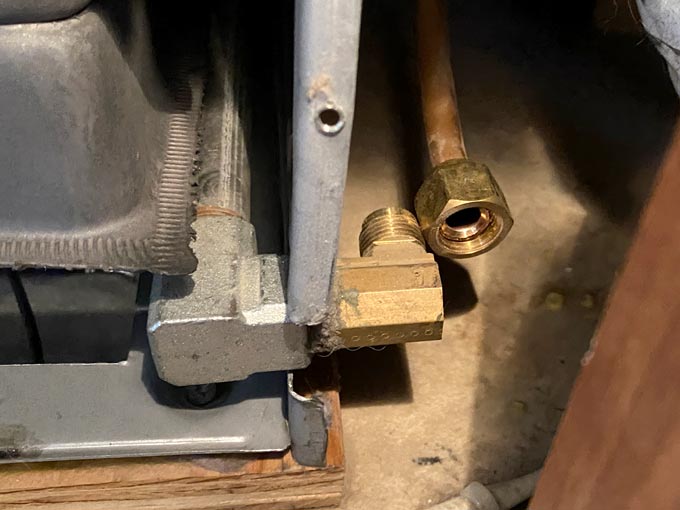
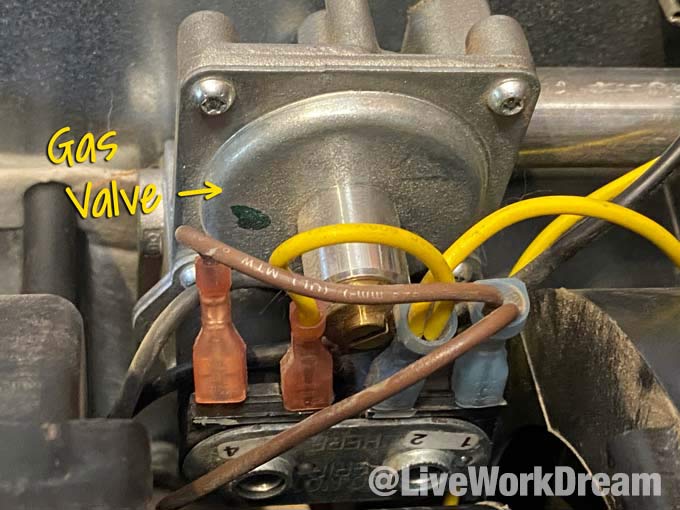
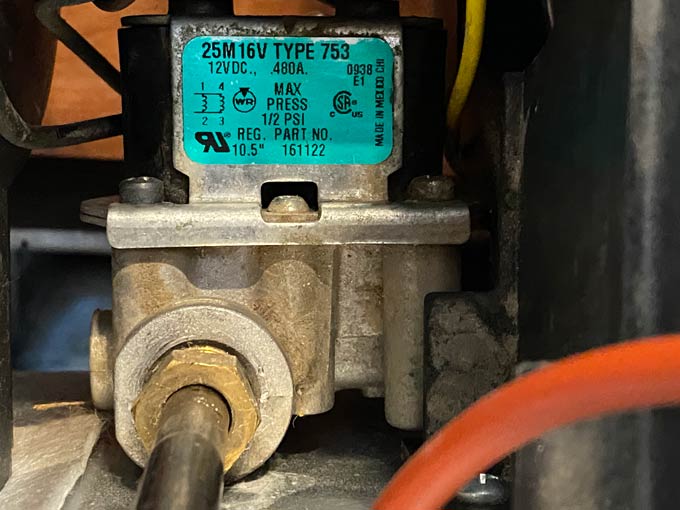
Replace Bad Gas Valve and/or Igniter Electrode
- Locate gas pressure valve and remove wires, noting their locations. (Mark with tape, take a photo, or refer to the pictures in the previous section.)
- Disconnect gas line to combustion chamber from top of valve using 5/8″ open ended wrench.
- Remove cover plate from combustion chamber.
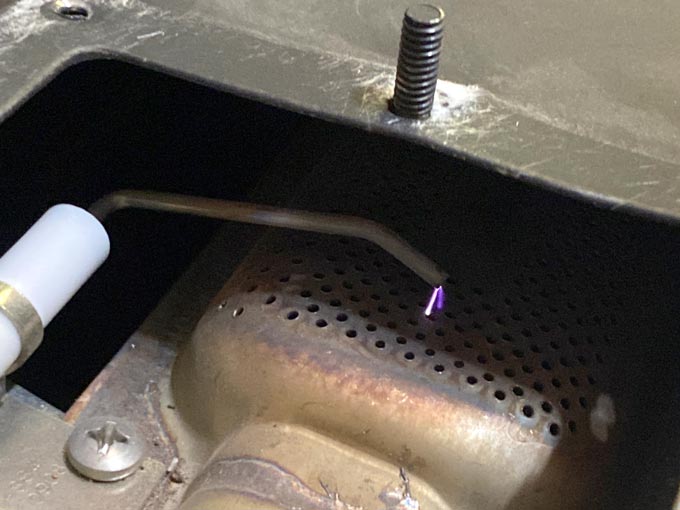
- Activate furnace at thermostat and observe electrode for spark.
- If no spark is present but voltage is, confirm 1/8″ gap distance or replace electrode.
- Disconnect valve from gas supply line.
- Connect new gas valve to supply line.
- Reattach wires to correct contacts.
- Replace chamber cover, ensuring consistent seal around fireproof gasket.
- Connect gas line to valve.
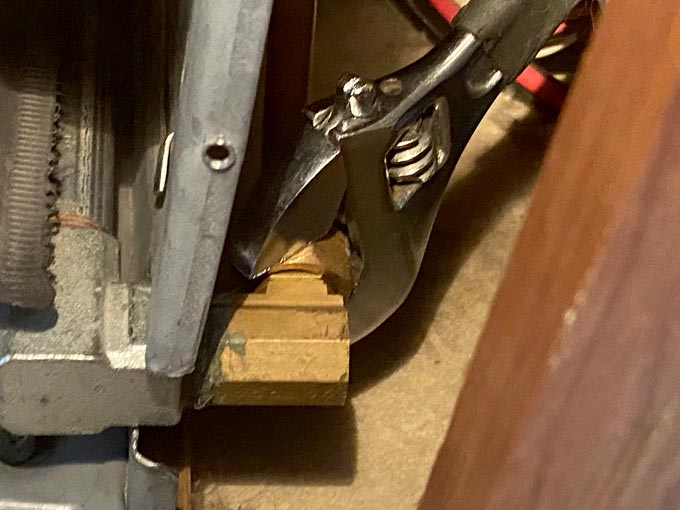
BONUS: Important Tip for Installing RV Furnace
When first reinstalling our RV furnace, I had a had a hard time inserting the burner/blower assembly. Something was preventing me from inserting the furnace into the metal housing. I couldn’t push it back in. And, I couldn’t see underneath it while pushing. So, I had Rene look from below while I wiggled it, pushed and pulled from above.
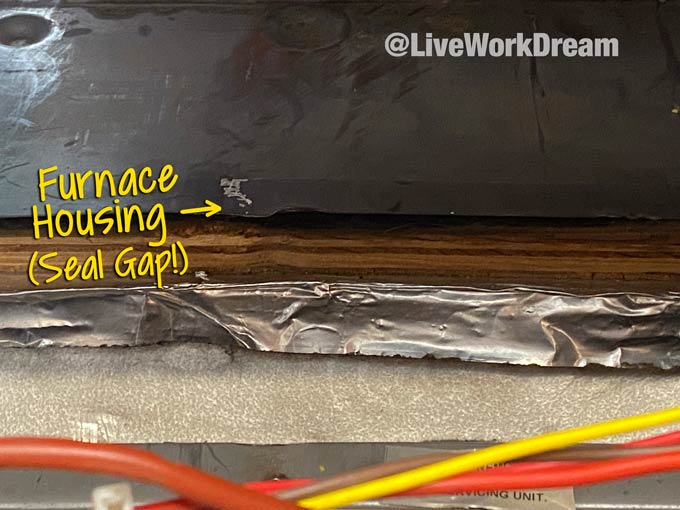

Don’t force it! I gave up and pulled the furnace back out. After that, I noticed a small dent in the sheet metal floor of the furnace housing. The gap beneath was causing the metal to bend upward. As a result, the furnace was catching on the metal. I temporarily used duct tape to seal the gap. I knew I would be pulling out the furnace again to replace the control module board. And I certainly didn’t want to smell meting tape the next time we used the furnace.
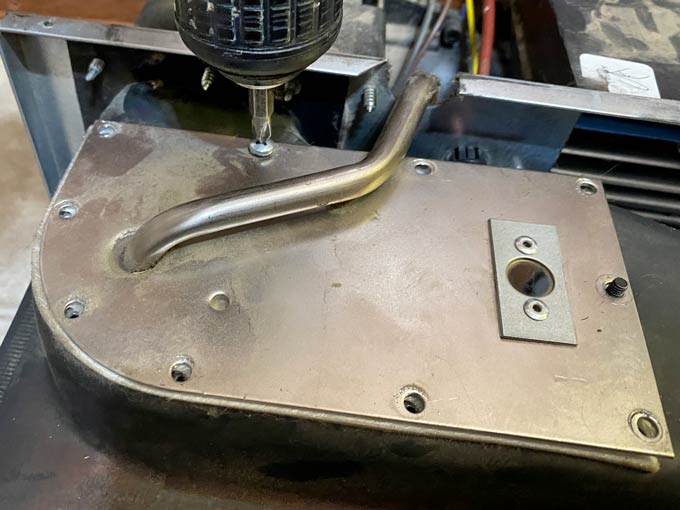
Seal RV Furnace Floor for Easy Installation
So, apply heat resistant foil tape to create a smooth seal across the bottom of the furnace. This allowed me to easily reinstall the RV furnace once I had repaired it once and for all…
Can’t Fix RV Furnace? Drive South!
Here’s one final fact about fixing an RV furnace: If all else fails, and the weather is getting cold…it’s time to head south for the winter!

Any Questions?
What have you done to fix RV furnace problems?
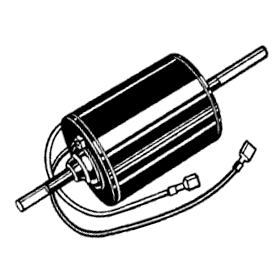
The blower motor was bogging down and sticking so We replaced the blower motor, put it all back together. Now the blower contiually blows. Did we wire something wrong? Everything tests right We need help – Baby its cold outside!!
Brrr…good question! Check to make sure the sail switch isn’t stuck. If flame is still on when blowing, maybe the thermostat is bad or bypassed. If it’s continually on regardless, something may have been rewired wrong indeed. Good luck!
Ensure that your thermostat is set to a temperature higher than the current room temperature. Sometimes, a simple adjustment to the thermostat setting can solve the problem.
Myra furnace is not burning right it has a bad odor on the exhaust outside and the exhaust is black with sut
Dang, I’d stop running it immediately! Service the entire unit, give it a good cleaning and check/adjust the gas until you get a good flame. Sounds like poor ventilation to the combustion chamber or a bad gas valve.