While Eternabond is a quick and easy fix, there will come a time to replace the bathtub if you live full-time in in your RV. That time cost us more than $800 with our previous trailer. This time I did it myself, and I discovered a few things sure to help anyone doing the same.


Replacing your RV tub and surround is not as difficult as you may think, if you have all the right parts and follow a few simple steps.
How To Replace RV Bathtub and Tub Surround
Watch this video of me replacing our tub for an overview of this project, then read on below for helpful tips, detailed steps, and lots of photos!
[hr]
Three Tips for Quick and Easy Tub Replacement
Here are my top three recommendations when replacing your RV bathtub for the first time.
1. Replace the tub surround at the same time!
The RV tub surround is very difficult to remove intact. I would have finished this job if half the time if I did not need to salvage and clean the surround. My most important tip is to rip out both the tub and surround, and any plumbing fixtures, without taking precious care—and time—to salvage, clean and reuse anything. You will have an entirely new sower stall, and the time you save will be well worth the added expense!
2. Be prepared for the unexpected.
Who knows what you may find upon removing your tub!? I discovered our new tub was too short, and required some impromptu remodeling. (See video above and photos below for details.) Once your plumbing is removed, you will be without water until you are done. So be prepared for as long as it may take to finish the job—which may be longer than you had planned.
3. Measure carefully and get all the right parts before you start
I searched a long time for the perfect replacement RV bathtub. When I thought I had ordered the correct part, I received the wrong color tub due to a poor product description. Read all product reviews! I wanted to purchase a fiberglass RV tub, but decided upon the more common ABS Plastic RV Bathtub after reading reviews explaining how the the other did not match their specified dimensions.
[box type=”download” size=”large” border=”full” icon=”none”]Scroll down for more specific tips and helpful suggestions![/box]
[twocol_one]
What You Will Need:
[unordered_list style=”tick”]
- New RV Bathtub
NOTE: Ours is a 24×40 Left Hand Drain Tub - New RV Tub Surround*
- Bathtub Faucet*
- Shower / Tub Drain
- Panel Retainer Clips
- 100% Silicone Caulk
- Dicor Lap Sealant*
[/unordered_list]
[/twocol_one] [twocol_one_last]
Recommended Tools:
[unordered_list style=”tick”]
- Screwdrivers
- Channel Lock Pliers
- Utility Knife
- Putty Knife or Flat Pry-Bar
- Rubber Mallet*
- Caulking Survival Kit*
[/unordered_list]
*Optional, but recommended!
[/twocol_one_last]
[hr]
Detailed RV Bathtub Repair Steps & Photos
1. Important: Select the correct replacement tub!
Take precise measurements of your current tub, including the length, width, and depth. Our tub is a Kinro Composites White 24X40 Left Hand Drain. Be sure to make note of which side your drain is on!
2. Remove shower curtain assembly.
Retract the shower curtain and remove the top slider bar first. Next, remove the catch bar and bottom guide bar. Carefully remove spool assembly. If attempting to save your tub surround, be extra careful. The reel housing may be attached with very aggressive adhesive foam tape.
Using a sharp knife or pulling too hard can crack the tub surround. Suggestion: Replace the tub surround too!

[box type=”download” size=”large” border=”full” icon=”none”]NOTE: Click thumbnails to enlarge photos.[/box]
3. Remove plumbing fixtures. (Turn off water first!)
Remove shower hose from downspout, if applicable, and remove the shower head holder.
Access your plumbing from the opposite side of the wall where fixtures are mounted. Make sure water is off, and unscrew plumbing from back of fixture. Unscrew mounting rings from back of fixture to remove faucet from the front.

4. Remove Tub Surround.
Remove all panel trim clips from surround. TIP: Use an old fork to remove the clips by wedging tines under head of pin and pulling straight out.
This is the fun part…If saving your sub surround, take special care not to crack the plastic while removing all pins and adhesive. I used a utility knife and caulking tools to carefully remove all caulk, then used a flat pry bar release adhesive from behind the surround. Trying not to crack the surround was very time consuming.
Suggestion: Yank out the surround without worry of breaking it, by replacing it with a new one. That could be fun too!


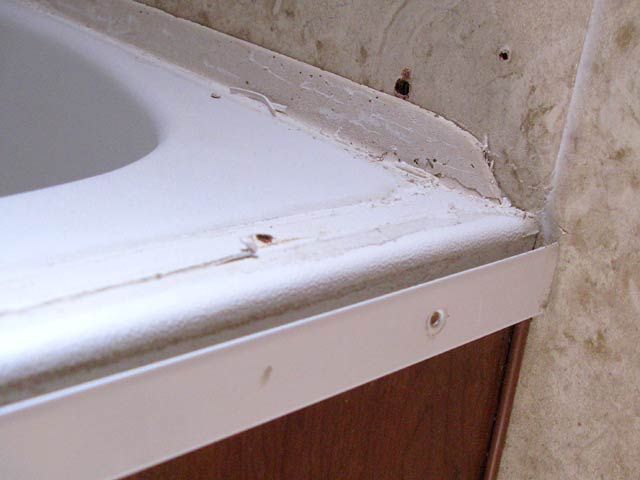
4. Remove apron retainer strip.
Don’t forget to remove the metal strip attaching the tub rim to the bathtub apron or frame. Unscrew all the screws holding the strip in place, and your tub is almost ready to remove.
5. disconnect drain
Remove the drain prior to any attempt to remove the tub. Access the plumbing from below the tub and unscrew the drain from the P-trap.
TIP: You may be able to remove the drain from above by inserting needle nose pliers into the drain and twisting them with channel lock pliers. This only broke the drain for me, and I found it easy to attach the drain with the tub removed.

6. Remove tub.
Once everything is disconnected, the tub should lift right out. It is surprisingly lightweight.

7. Connect drain to new tub.
Remove downspout from old tub and attach new drain to downspout through hole in the bottom of new tub. Watch video for details.
8. Replace Bathtub.
Re-seat new tub by inserting attached drain into hole of platform for attaching downspout to plumbing. Ensure that drain inserts into P-trap.
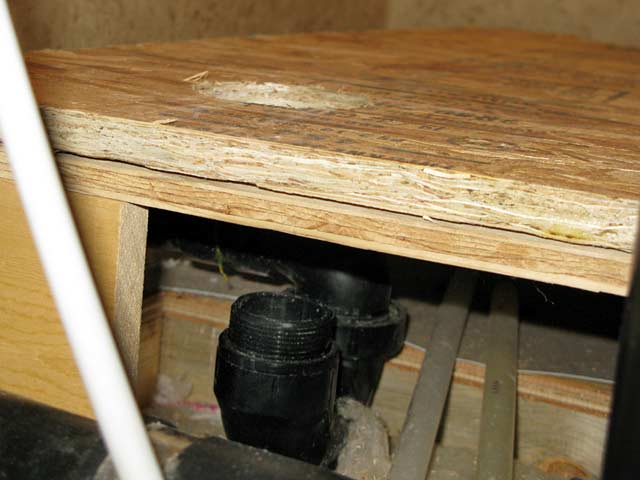
9. Ensure proper fit!
Press down on bottom of tub to ensure it is seated firmly on the platform. Ours was not. The new tub was a bit too short!
TIP: To make our new tub fit, I had the option of cutting down the apron framing. Instead, I cut 1/2″ thick plywood to fit the tub platform, and cut a hole for the downspout. I attached this riser to the platform with drywall screws, being careful not to pierce any plumbing. This raised the platform just enough so our new tub sat firmly on the ground.
Attach downspout to plumbing by screwing down the retainer ring.
10. Replace tub surround.
Once tub is in place, put the (new) surround back up. Apply silicone or lab sealant along the tub rim, and in any of the retainer clip holes. Insert new trim clips back into existing holes, or drill new pilot holes for clips if necessary. Press firmly and/or use a rubber mallet to secure surround to wall.
11. Replace plumbing fixtures.
Insert new RV tub faucet from front side of tub. Attach retainer rings to fixture from behind the wall. Next, attach the plumbing onto the fixture pipes. Pay attention to which plumbing is hot and cold!
13. Replace shower curtain assembly.
Attach shower curtain reel and rods, in steps opposite those you took to remove it. Apply silicone or sealant to help affix the spool side to the surround. Attach bottom guide bar, catch rail and top bar, inserting curtain first so it glides easily and connects to catch.
12. Seal all seams and clean up.
Turn the water on to test your plumbing, and ensure there are no leaks. Run the water and check drain from behind. Once confident all plumbing is secure, dry the tub and apply 100% silicone bath sealant to all seams.
Thoroughly clean all debris from tub, allow caulk to fully dry, and enjoy your new bathtub!
Any Questions?
Please leave a comment with any questions or tips you’d like to share!
Subscribe here to be notified of new blog posts! Unsubscribe any time and keep your free gift!
Soooooo…. I have a 30+ year old tt that has been jerririgged quite a bit by previous owners. Yesterday I discovered the space under the tub is completely open. Basically, it looks like a reservoir, lake, pool, ot whatever you want to call it. What I’d like to know is if this sounds normal to you. ….btw so far it doesn’t appear to be leaking into the subfloor, but who knows maybe I haven’t n noticed it yet. Also, whenever I empty my tanks that reservoir area stinks to high heaven until I pour more enzymatic cleaner down the tub drain. Please advise me on what you would do with this situation.
Normal? Sounds more like nightmare! The smell should be a good indicator that something is definitely wrong.
What you’re describing sounds like a pool of water under your tub. Sounds to me like there is some plumbing missing. I would start by ensuring that all drain connections are in place and sealed, all the way from the tub to the holding tank.
Good luck with that one!
say, you seem like you have skills and knowledge, what about using epoxy to make a shower??
pick a good hardwood, make the shower the way you want, then slap it with epoxy to water proof it..
what are your thoughts??
Seems like a rather permanent solution, and a nightmare to repair, even messier to install…definitely not something I would ever consider in an RV, with all the moving around hardened epoxy would likely crack pretty quickly.
I see in the picture the hoses that screw into the actual faucet what are they called? I am trying to find some hoses like that, that I can bend 90 degrees for a shower.
From behind, or on the faucet on the shower side? Every RV has different plumbing. Many use Pex, our bath faucet connectors are standard compression fittings available at any RV supply.
Hey!!! How do i get that top bar off?
Hey!!! Unscrew the side rail that holds it in place, and you can remove both the top and bottom bars.
I’ve wondered about removing the tub to replace it with a walk in shower instead. Do you think most of this would be the same or similar? Or are some RVs made so this idea would be impractical, or impossible?
That shouldn’t be a problem. You would just need to find a shower pan to fit, adjust the drain plumbing, remove the tub skirt, and find a door/curtain solution to avoid splashing. If the skirt / tub frame appears integral to the structural integrity of bathroom walls, though, I would rethink that remodel.
Sounds like a fun project!
A trick an oldtimer showed me to get a leak-free caulking job on your tub is to fill it with water, before you caulk the tub to the surround. This compresses the tub as far as its going to move, and when you dump the water, the tub will rebound just a little. Caulk with out water in the tub and you may end up with a small leak that you don’t even see until the floor is rotted.
Nice tip, thanks for sharing! Interesting too, since I doubt they do that at the factories.