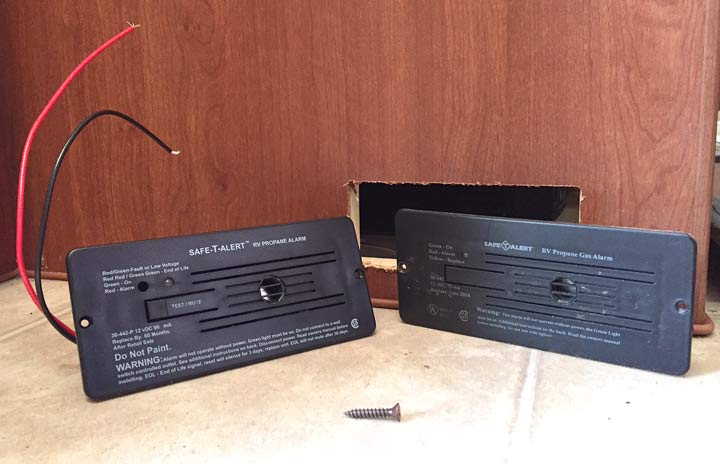
This has to be one of the easiest RV repairs I have ever done, and one of the most important.

Why is the LP Detector in My RV Beeping!?
If the propane leak alarm in your RV is constantly going off, don’t panic. In most cases, the detector is just old and needs to be replaced.
Propane gas detectors should be replaced every 5-7 years. In fact, you will find an expiration date on the front of most common LP leak detectors.
That being said, please investigate immediately if you think you may have a propane leak! The alarm is there for a reason. If your RV or propane detector is new, do not read any further. Do not pass go. Open all your windows, vacate the RV, turn off your gas and figure out what is going on…most likely, the alarm just needs to be replaced.
So like I said, don’t panic. Here are a few simple steps to replace the propane detector in your RV…
How To Replace RV Propane Detector
FIRST: Purchase a replacement RV Propane Alarm for your RV. Some models will detect both propane and carbon monoxide. We have a separate carbon monoxide detector, so I bought another SAFE T ALERT RV Classic LP Gas Alarm to fit the same hole as our previous detector.
1. Turn off Power to Alarm
Shut off the power to the circuit with your detector. It is most likely a DC circuit, so you can cut the power by removing the fuse, usually clearly marked on the power panel.
Do not do like I did, and remove the fuse for a few weeks because you’re sick of hearing the alarm go off, even though you know it is just old and needs to be replaced. Just get a new alarm now, it’s quick and easy to replace!
2. Remove old Propane Alarm
Unscrew the face plate and snip the two wires leading to the detector. Hopefully yours is conveniently located inside a cabinet like ours was!
2. Strip Detector Wires
Remove some shielding from the end of the cut wires
2. Re-wire New Alarm
Connect the leads from the new alarm to the wires you cut. Match up the colors and use connectors for a secure connection. I find nylon crimp connectors work best for DC wiring and keep a collection on hand for various RV wiring projects.
2. Re-attach and Test Alarm
Screw the new propane alarm back in place, and you’re good to go! Almost.
Replace the fuse to turn the power back on and test the new alarm a few times. No, don’t just turn on the gas stove and wait. Simply press the test button on the front! With a new unit, you may need to press it a few times—and bear with the piercing noise just a bit longer—until you get a solid green light indicating all is good.
False Alarm
Funny story: When our propane detector first showed signs of going bad, it would sometimes sound off for apparently no reason. But it was clearly becoming more sensitive. One time I took my shoes off and placed them on the floor next to the detector…BEEEEEEEEEEEEEEEEP! 🙂
Oh, and here’s a hint: Do not use compressed air thinking the alarm sensor just needs cleaning! That stuff comes in very handy for keeping electronics clean on the road, but the propellant will set off a propane detector.
Any questions?
Comment with any questions or tips of your own and stay tuned for more RV maintenance posts and DIY RV repairs to save money from unnecessary shop visits!
Subscribe below to be notified of new posts if you like what you read here, and please let us know if you don’t!


