 I know what you’re saying. “Oh boy, here he goes again … off on another one of his geek rants.”
But surely someone will be grateful for finding this information. It sure isn’t on the MotoSat technical support website where it should be.
When we started having some trouble locking onto our satellite for internet access, MotoSat suggested we upgrade the firmware in our Datastorm D3 dish controller. The support rep then promptly proceeded to rattle off a number of important steps, too quick for me to write them down. I decided to wait, thinking I would find details on their website.
Not. I present them here in excruciating detail for your reading enjoyment, or complete boredom whichever you prefer.
The procedure for upgrading the D3 controller is relatively simple. Relatively being a key word, considering if the upgrade fails in mid process the controller must find its way back to Utah for reprogramming. And there are few steps that ensure this won’t happen, and a few others that will make your life a whole lot easier. Like that first one for instance …
Before upgrading your MotoSat Datastorm D3 firmware:
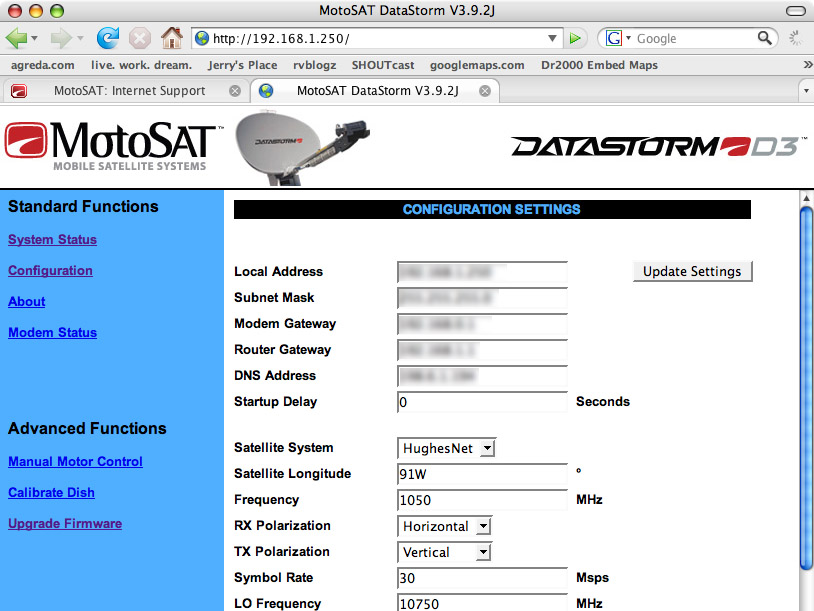
- Copy your configuration settings! Only the networking and satellite assignments are required, but I found it best to take a screenshot of the browser window with your configuration screen for easy reference of all settings.
- Download the latest D3 software release (v3.9.4 as of this writing). Save the .zip file to your hard drive and decompress the archive. Remember where you saved this file!
- You are now ready to upgrade your firmware.
Don’t just click that Upgrade Firmware button just yet! MotoSat recommends upgrading the firmware in “boot mode” for best results.
Step-by-step instructions for upgrading Datastorm D3 firmware in boot mode:
- Hard-wire into the D3 via Ethernet. (Do not use a wireless connection. See note above about what happens if your upgrade fails.) A crossover cable is required for connecting directly to the D3. Connect via your router if necessary.
- Turn off the D3 controller.
- To turn on the D3 in boot mode, hold down the search and stow buttons while turning on the power button. NOTE: the IP address will default to 192.168.0.250
- Configure the IP address of your computer to be on the same subnet as the controller (i.e.; 192.168.0.10).
- Using your web browser, go to the interface for your D3 (Now located at: 192.168.0.250)
- Click on “Upgrade Firmware”
- Upload the new hex file you unzipped. Not the zip file!
- It is very important that this process in not interrupted. See note above about what happens if your upgrade fails.
- When the status message indicates your upgrade is complete, reset the D3 by turning off for at least ten seconds.
- Turn on D3 in boot mode again by holding down search and stow buttons. NOTE: the IP address will default to 192.168.0.250
- Telnet into the D3 using a terminal window.
- Type “nvclear” (no quotes) and hit Enter.
- Once status is “cleared” type “reboot” (no quotes) and hit Enter, or turn off the D3 and turn it back on again using only the power button. NOTE: The IP should default back to 192.168.1.250
- Change the IP address of your computer back to be on the same subnet again. (i.e.; 192.168.1.10)
- Telnet back into the D3, now in normal mode (192.168.1.250).
- Type “ucbupdate” (no quotes) and hit Enter.
- Return to the web interface for the D3, which should read “Programming Mount”
- When the process is 100% complete, reset your networking and satellite assignment configuration settings and save the changes.
- Run a dish calibration.
- Hit the Search button, grab a beer, and surf the web .
A few things they don’t teach you in high school:
- Stow the dish first. This is not necessary, but IF the upgrade fails, you may be stuck with a dish in the up position.
- The firmware may not be the problem if it just takes a long time to lock onto your satellite. (I don’t think it was our problem.) Make sure your Signal Trigger configuration is set to no more than 5. Ours was set at 9 by our installer. This is the minimum signal strength required to lock on.
- If your system is all powered by one power strip switch (ours is), be sure to configure the Startup Delay setting to about 45 seconds. This gives the D3 ample time to receive communication from the modem, without which it will have a pretty hard time getting you online.
- The Hughes HN7000S modem has a display bug on the System Info screen. More than just a “bug” if you ask me, considering the receive and transmit polarization info is reversed!
When in doubt, call MotoSat support at 1-800-247-7486. They are very helpful, if you can just get them to speak slowly.
i spent a lot of hours while in las vegas talking to the tech guys trying to fix our satellite connection -and youre right, they’re all very helpful and friendly.
im sure other people who own a satellite dish would find the info very helpful. and that photo of the motosat mainpage – im all too familiar, a few more weeks and we’ll be seeing that page again!!!
ur rite ! i was bored !!