What do you do when your slide out leaks and you’re not sure why? Unless you want to spend a lot of time and money at some RV shop, the answer is to first find out the cause of the leak, then fix it yourself!
Why Does My Slide Out Seal Leak?
The most challenging part of any RV maintenance project is often determining the exact cause of the problem, and identifying the proper terminology regarding any applicable fix. The fine folks at Northwood Manufacturing have always been very helpful whenever I have called to inquire about the equipment and appliances in our Arctic Fox 275B or previous AF 245N.
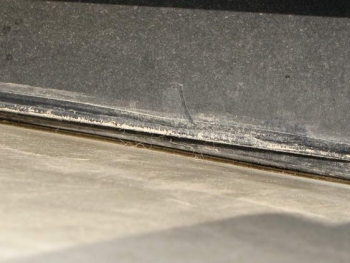
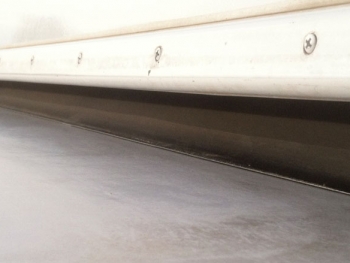
When troubleshooting a leak along one wall of the slide in our fifth wheel, I discovered the top flap seal was not creating a tight seam along the roof. A gap of nearly 1″ was allowing rainwater to penetrate the inner seal and run down the wall inside our RV.
OK, step one accomplished. But why wasn’t the flap sealing properly? Inside the RV, I ran my hand behind the interior seal with the slide all the way out, and discovered a gap behind the trim on one side of the room. I suspected the slide was out of alignment, so I took a closer look at the mechanism that moves the room under the rig. Upon initial inspection, I discovered the slide-out rails and motor assembly are really pretty simple?a drive motor, shaft with gears at both ends, and two rails.
I measured the distance on each side of the slide to confirm my suspicion. One side was extended out nearly 2″ farther than the other. I thought there’s gotta be a simple way to realign the slide. There is.
Synchronize Your RV Slide-Out Rail Timing
The technical term for describing our slide being out of alignment is: the rails are out of synch, or the gear timing is off. So, technically speaking I adjusted the timing of the rails supporting our slideout to realign the room. Follow these simple steps below to synchronize your RV slideout rails, and adjust the slide to prevent leaks caused by a misaligned flap seal.
[box type=”note” border=”full” icon=”https://liveworkdream.com/wp-content/themes/memorable/functions/images/ico-info.png”]Note: These instructions are for synchronizing a two rail slide-out room with the Power Gear slide-out system for standard or flat floor. Procedures for your system may vary[/box]

Power Gear Slide-Out Inner Rail Alignment
- Remove cotter pin from idler drive shaft.
- Push the idler drive shaft toward opposite rail to disengage the gear from the gear rack.
- Adjust the gear timing by sliding the idler rail side of the room to the proper position (Measure to ensure the same distance from
the frame as the drive rail side).* - Push the idler drive shaft back into position, engaging the gear onto the gear rack.
- Reinstall cotter pin into idler drive shaft.
Extend and retract the slide a few times and check for proper room flange sealing. If the room is not properly aligned, repeat steps 1 thru 6.
*Depending on the size of your slide, you may need help moving the room by hand.
[box type=”note” border=”full” icon=”https://liveworkdream.com/wp-content/themes/memorable/functions/images/ico-info.png”]Tip: To move idler rail once the gear is disengaged, lift the room from the outside or push that side of the room out from the inside.[/box]
Download Power Gear Slide-Out System Manuals
[unordered_list style=”arrow”]
- Print these slide-out rail timing adjustment instructions.
- Optional: If necessary, print these instructions for slide-out room vertical adjustment.
- Download complete Power Gear Slide Out Systems Service Manual
(4MB, 111 pages covering all Power Gear Slide-out models). - Search for your specific RV slide-out model, and find all Power Gear Manuals here.
[/unordered_list]
Photos of DIY Slide-Out Rail Alignment
Since a picture’s worth so many words, below are some photos I took to help illustrate the steps described above for synchronizing our Power Gear RV slide-out rails.
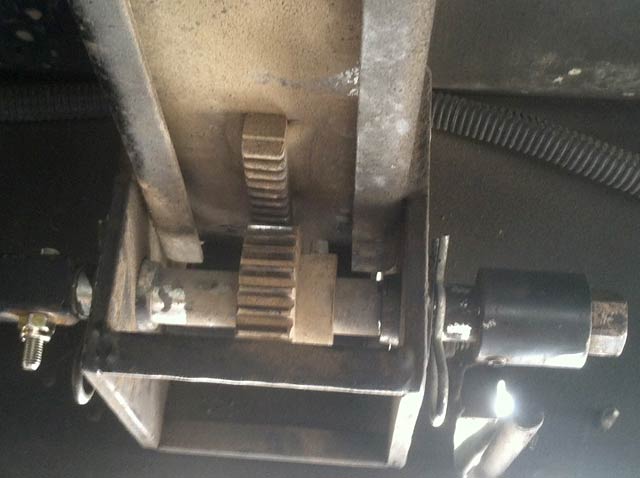
The photo above shows the idler rail, or “slave” rail with gear engaged in the normal operating position and cotter pin attached. It is not necessary to remove the drive shaft from the gear (retainer bolt shown at left).
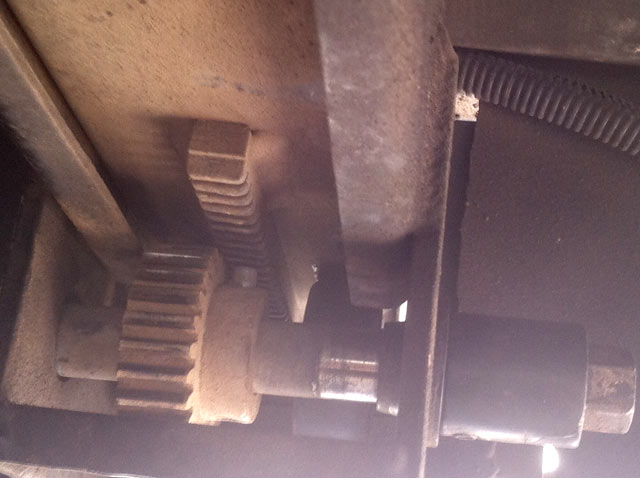
By removing the cotter pin, the gear can easily be disengaged from the idler rail gear rack by sliding the drive shaft toward the drive rail, under the opposite side of the room (to the left in this picture).
The gear disengaged easily for me by shaking the drive shaft a bit as I shoved it toward the other rail. The nut shown at right is the manual override nut for manually moving the slide in the event of motor failure. Tap on that lightly with a mallet while sliding the drive shaft if necessary.

Once the idler rail gear is off the rack, both rails can be synchronized by manually moving the disengaged side until the room is aligned properly. Refer to photo above of gear engaged on the rack in proper functioning position before operating slide-out.
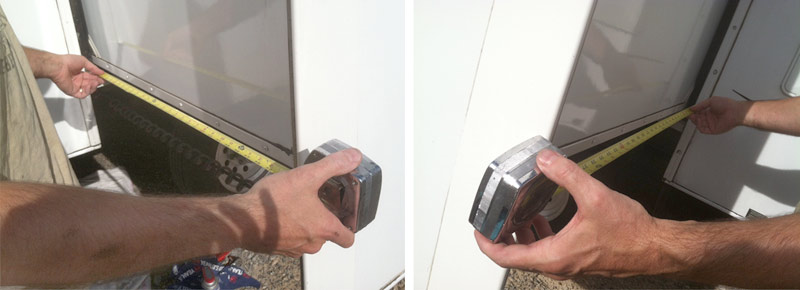
Once the gear is engaged, operate the slide-out and measure the depth of the slide on both sides to ensure proper alignment. Measure under the slide from the frame to the inner wall and/or from the exterior of the RV to the outer edge of the slide.
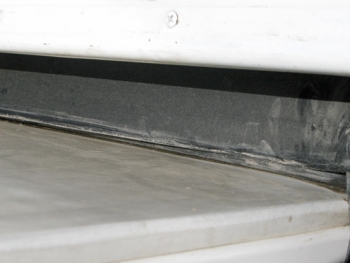
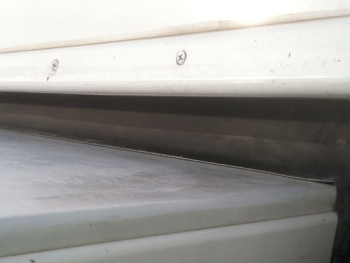
Finally, visibly inspect the flap seal to ensure a tight flange seam. Compare these two photos to the very first pictures in this post above and notice how synchronizing the slide-out rail gears fixed the gap causing water to leak into our RV.
I guess we won’t know if this fix did the job until the next big rain storm, but the seam sure looks a lot better! Subscribe below to be notified of future blog updates if you want to find out.
Subscribe for Updates from LiveWorkDream
We never send spam. Unsubscribe any time and keep your free gift!
I have a 2009 34Y meridian motor home . the full room slide, drivers side, will not retract all the way at the rear made 11/2 out. I can see where the slide is dragging on the carpet in the rear end. I think it needs to be raised there . Can you help ?
With no idea what type of slide mechanism your rig has, I can’t be much help. If it uses geared rails with master drive motor and slave, I’ve already provided the best help I can above. Good luck!
I have a 2003 Jayco 3200SL Granite Ridge Class C. The slide has shified toward the drivers side to where the seal on drivers slide is bunched up. While it will retracts fine — it binds up when going out and the top has to be pushed before it will finish going out. Can this be adjusted?
Can it be adjusted? Probably! I’m not familiar with that slide mechanism, but if it’s anything like ours was, the procedure could be the same as I described. Good luck!
I have a 38foot with four slideouts 2 hydrolic and two electric; The one hydrolic [kitchen slide[ is tipping down and hitting the floor when retracted and tearing the vinyl. Is this a adjustment or what can be done. This is on a Gulfstream Sun Voyager.
Yes, a pretty common problem. Something clearly needs to be adjusted there, though I’m unfamiliar with that brand. Measure for anything out of alignments and get under there to check for points that can be adjusted. Good luck!
Jim,
I just used this article to fix (a bit) our uneven slide on a 2016 Jayco Greyhawk. Thank you so much. One Question & one commment. Is there a reason there is only a small amount of movement in or out when the gear is disengaged? AND… a BIG POINT: we discovered by accident that we were only able to push/pull the slide in/out when it WAS NOT all the way out. Thanks again.
Ron
Good job! And thank you. 🙂
I have a 30′ Komfort RV 2001 and my slide out when I bring it in has a hard time coming in and I have to have someone pushing it form the out side and then it comes in on its on and when I take it out it sounds like its hitting on a hole on the drivers side and also the awning on the slide out keeps breaking the brackets on the slide out roller bar what to do
Bummer! Sounds like some serious immediate investigation is required to figure out what’s going on. For starters, stop using it or whatever is wrong will only get worse. If you’re not comfortable getting under there and inspecting the motor and all moving parts while someone operates the switch, take it to the shop ASAP.
If the awning brackets keep breaking, consider removing the awning to see if that’s what might be causing the problem. Keep using the slide-out the way you are and you’re bound to destroy the motor, unless it has already gone bad. Good luck!
Jim-I stand corrected, it looks like Dutchman installed the track for the outer seal too low. Is that possible? I didn’t see any kind of roller behind the gasket under the slideout that can be adjusted. I did adjust the height on the outside edge of the slide out.
Anything is possible! We also had a gap on one end of the slide roof seal, I addressed by re-aligning the gears as i describe in this post.
Hi Jim, I have a 2017 32′ Coleman Lantern with a 13′ slide out. The top edge on one side is tearing up the seal on the roof. Looks like the roof is just about hitting the framed opening. Is there a height adjustment for the slide? Hidden rollers? It’s for the dinette and sofa
Great article.
Hello Jim. I don’t want to sound redundant, but I think my issue is a little different than I’ve read, (but I could be wrong). My 2004 Keystone (elec. motor) slide-out drops 1-1/2″ – 2″ on the front side only just as it fully extends, therefore coming out of contact with the top, outer seal. Also, when closing the slide, it makes contact at the top first then the bottom comes in but doesn’t make a watertight seal. Can all this be solved by making the slide-rail alignment, or does it sound like more is going on here? Thanks in advance for your expertise.
Unless I’m mistaken, your symptoms sound pretty darn close to what I encountered and explained in this post. It’s pretty easy to determine if the rails are out of alignment…extend the slide and measure the distance on each side.
Ah yes, I missed the part where you mentioned it being on one side of the room. Checking for a consistent gap sounds like a good place to start with most of these alignment issues regardless. I’ll give it a shot. Thanks Jim.
Hi Jim,
Our system looks very similar to yours, but I have a spur/crown gear with stripped teeth. Any idea on how to get to the gear to replace it?
Thanks!
Bob
Hmmm…no idea, since our slide uses a different gear and rail set-up. Sounds like the gears on our front support legs. I had to remove the leg to replace that gearbox.
Have a slide that has a 2 in gap at bottom ,top is tight
Good luck with that. By “gap at bottom” I’m guessing you mean on the side seals. Check the manual for your slide and follow some basic troubleshooting steps by adjusting the rails to align everything.
Hi I have a 2016 bighorn 43 foot with three sldes the right slde drops about a one half inch when open and the top seal does not make good contac with roof causing water leak. The left side has the same setup no problem with it.I put some hard rubber spacers in the tray to keep it from dropping .Is there and adjustment or is this a mfg problem?
Charles, the issue you describe is identical to the challenge we faced – which I explained how I fixed in this post. If the taking the steps above does not fix it for you, then you should contact your manufacturer.
i have a 98 Alpha Gold the bedroom slide is fully extended out i have a gap of about 1 1/2 inches at the bottom the top is tight , it seems to close just fine ,any idea on a fix
Sure, check the alignment of the rails, just like I did in this post. Find a copy of your slide manufacturers manual if necessary and follow the steps for aligning the rail gears and/or the room height adjustment. Good luck!
Hi
I have a 2015 crusader by prime time with a lippert slide out, It has rubbed off the covering on the left side bottom of the the plywood, (I have pics I can send )prime time has sent has sent me tape to repair the damaged portion but not how to fix what caused the problem. I think the cover got worm off because of an alignment problem. It is approx 4″ wide by 12 to 16″ long on the front of the bottom side of the slide. I want to fix the problem before i repair the seal and covering on the plywood. Any suggestions?
Thanks
LK
Damage to the bottom/floor would suggest the height of the slide needs to be adjusted on one side. Good luck!
Jim
Need some info on how to get top of slide to seal tight
Billy
That’s exactly why I wrote this blog post.
Hey Jim i have a 2003 coachman catalina when i pull slide in top left corner is out of line and wont close. I dont have vertical adjustments the slide was made by RBW industries cant find a thing on them the company was no help. Any thoughts on where to go from here thanks Andy
Did you try adjusting the rail gears like I described above? Sounds very similar to the problem we had, only with the slide in instead of out. I would pull the slide in, disengage the gear on the side having trouble, push the slide in from the outside, and realign the gear.
If all else fails, RTFM. Consider posting in some Coachman Forums, or contacting RBW.
Looks like you’re not alone. IRV2 has this rbw slide out problem forum topic.
Good luck!
Jim,
Just came across this and was wondering if you have any suggestions on alleviating an issue i have with the slide in my Tiffen Allegro big slide moving out while driving. moves out about 1″ to 2″. Seems like when i bring in the slide to all the way in when i let it go it moves out a touch. Like its not staying tight. Thanks in advance for any help you might be able to give.
Dave
Good luck Dave. I don’t even know if the Tiffin slide mechanism is rack and pinion like ours. If so, I would definitely get under there while someone operates the slide to see what’s going on with the gears when fully retracted. You may have some stripped gears. If it is hydraulic driven, you may be low on oil.
I have a 2011 Tuscany
My drivers side front slide isn’t going out in the front unless I push at first ..
the gear doesn’t seem to be touching until out a few inches
How do I adjust gear to slide rail ???
If you mean the gear is not contacting the track, check for any other alignment points that allow you to adjust the height of either the rail, the track, or the entire slide. Or, there is some sort of bent framework going on…ugh.
Thanks for some great information. I have a 12 foot slide on a 2000 Wilderness 5er. I just acquired it and don’t even have it home yet. The seller is institutionalized with dementia so I have no seller information. It appears that the bottom of the slide is not closing so to seal along the wall, but the top is in. Looks like some alignment issues for sure. I can see daylight from the inside. I downloaded all the links you kindly provided and hope that I’ll find a solution.
Good luck Roland! Check out the link to the vertical slide alignment diagram. Yours may be different, but the concept is likely the same.
If the top is hitting before the bottom, the bottom edge of the slide may need to be lowered.
I have a slide that is only leaking on one corner. I thought maybe the slides were out of alignment like you talked about above but they measure the same distance at the bottom. The actual slide itself is a couple inches short of fully extending on one top corner. I have inspected the top of the slide and there is nothing keeping it from extending out. This camper has 2 slides and everything seems to measure up to it other than one top corner. Any suggestions?
Sounds like the vertical alignment is off. See my link above for the slide-out room vertical adjustment instructions.
Good luck!
Jim, Great web site. I found your site when looking for adjusting the Power Guide slide. Great instructions. Thanks.
You have a great deal of information on your site…many of your upgrades I’ve been considering. It’s great to get first hand experience.
I look forward to reviewing your site.
Thanks for the comment Ben! Happy travels…
i have a 30ft 1 slide-out…when i take it in, the top hits first then the bottom comes in and when it is all in my slide floor is up off the trailer floor by a couple in. …when out it seems to be level ….the sides are equal coming in or going out ..what do i adjust so my slide seals evenly when put in ? thank you for your time and knowledge
Our slide will also raise the floor a bit when fully closed, but not by a couple inches. Review the manual for your slide and you should find the mounting bolts at the end of the rails, near the exterior wall of the slide. The mounting plate should have some slotted holes that will allow you to raise or lower the outer end of the slideout. Just be careful, as raising it too much could cause a gap under seal when fully extended. Good luck Dale!