Ever since I read an article about hydraulic over electric trailer disc brakes in Escapees magazine last year, I’ve wanted to convert the braking system on our fifth wheel. After months of research, and finding the perfect solution, we finally did it!
After putting nearly 1,000 miles on our new brakes and taking nearly 100 photos of the installation, I’m excited and happy to share the results…they rock! Installing Titan hydraulic disc brakes has to be one of the best modifications we’ve done to our Arctic Fox—ranking up their with our solar power system and satellite internet installs.


Click thumbnails to enlarge photos. Read on for installation tips and reasons to convert trailer brakes.
Why Trailer Disc Brake Conversion
There are various reasons to convert your standard electric trailer drum brakes to a hydraulic over electric. The most important are safety and peace of mind.

Reasons to Install Trailer Disc Brakes:
- Improved stopping distance
- Quicker response time
- Easier, less frequent maintenance
- No adjustments necessary
- Less wear on truck brakes
- Peace of mind
Did I mention peace of mind?
For months after some grease monkeys jacked up our old brakes during a routine bearings job, we dealt with a nagging squeak that wouldn’t go away. That squeak turned into a persistent squeal, then a grinding sound that would make Rene cringe every time we slowed down. We have been to numerous different shops for brake issues over the years, and I had adjusted the shoes on our electric drum brakes more times than I care to remember.
So, after discovering trailer disc brakes, and talking to Titan at the SEMA show, I did some serious research on the subject. After reviewing a couple IRV2 Forum topics about Trailer Disc Brakes and Trailer Stopping Distance, I was pretty much determined on doing the job. The only remaining questions were where, and with which components.
Why Titan and Performance Trailer Braking
I decided to go with the Titan hydraulic disc brake conversion kit, because I like the idea of all system components coming from one manufacturer. It turns out their BrakeRite actuator—the brains of the system, and hydraulic pump—is superior to others on the market, offering faster response with higher pressure.
From what I had read about the conversion, I was strongly considering doing the job myself. And after seeing it done, I now know I could do it. That’s how easy it is.
I was actively searching for a shop to do the job when I contacted “Titan Guy” in the IRV2 Forums. Ron called me back immediately, on a Sunday. We spoke for a long time and he provided a wealth of information with no high pressure sales talk. As it turned out, Ron operates Performance Trailer Braking. When he told me he used to work for Titan, I was sold. When he told me he was the one who created and presented the training seminars for the company, I knew I was talking to the right guy.


And…when Ron told me he has a team of remote installers and could do the job anywhere I was parked, I was excited to schedule an appointment. The next week, I met Ron in his booth at the Quartzsite RV Show and we had our new brakes installed the next day while boondocking nearby.
How To Install Titan Hydraulic Trailer Disc Brakes.
Ron has Titan installation manuals and a detailed tutorial video at performancetrailerbraking.com, so I’ll just provide an overview of our install and a few tips I learned. But I will tell you one thing: whether you purchase and install a kit yourself, or schedule an installation with Ron, he offers better customer service than any shop we have ever dealt with in our 8+ years on the road! If you have any questions or concerns whatsoever, he’ll have answers for you.
FYI: Another benefit of getting the conversion kits from Performance Trailer Braking is that they include everything you will need to do the job—every connector, every screw. Once you have all that, you’re good to go, and if you happen to get stuck, you can call Ron for help. You don’t even need any special tools either. One thing that kept me from doing the job myself was that I thought I would have to flare the metal brake lines. Well, the kits come with all tubing cut to length and pre-flared with fittings attached! But I digress…
Safety first! Jack up your trailer and use sturdy stands under multiple lift points. Verify all new components being installed match your trailer axle specifications before getting started.
Titan Disc Brakes Installation Steps and Important Tips
The Titan Disc Brakes Installation Manual literally has just two pages of steps for converting your trailer’s drum brakes to their hydraulic over electric system. That should tell you how simple the procedure is. It just takes time. Our installer John showed up first thing in the morning, and we were done in time to take a test drive before dusk.
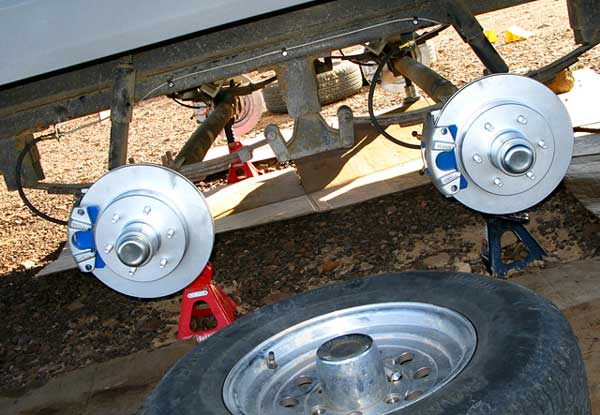
1. Remove existing drum brakes.
Clip wires to the electric brakes, and remove the drums and backing plates off the axle spindles. Knock out the old bolts, as new Grade 8 bolts come with Titan kit. Do keep the hub washer, slotted nut, and cotter pin (or use new pin of same size). These are the only items not included because, although there are standard spindle sizes, these parts may have unique specifications depending on the axle manufacturer.


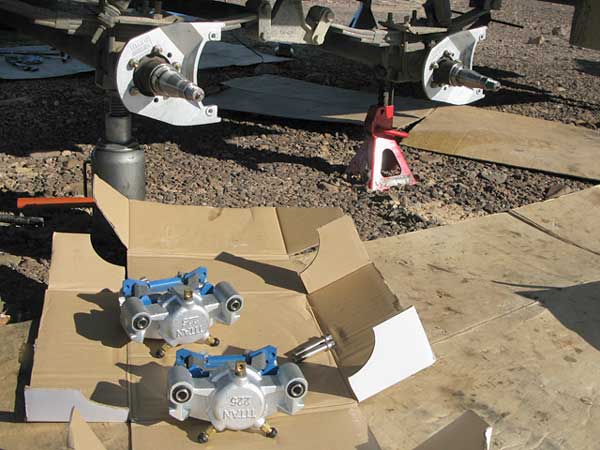
2. Attach new caliper brackets.
Mount the caliper brackets to spindle side (outside) of the brake flange. The orientation of the bracket should be in the 10:00 or 2:00 position. The calipers can be positioned either way, but the orientation should be the same for all—either on the front side, or rear side of the axle spindle.


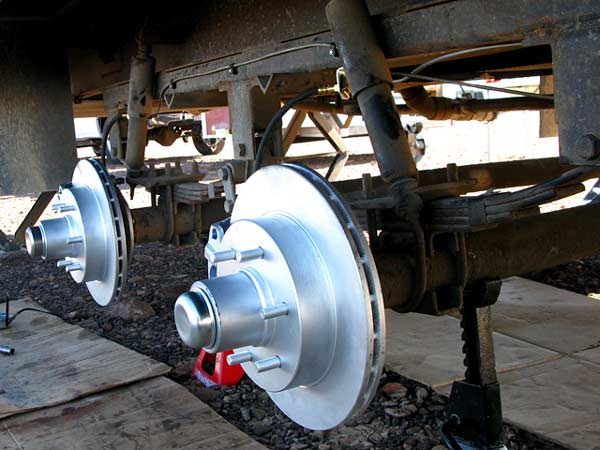
3. Install bearings and rotors.
Pack the wheel bearings with high temperature grease. Insert the inner bearing and seal into the rotor hub and slide the unit onto spindle. Secure the rotors in place by installing the outer bearing, washer, and slotted nut.
If you have never removed/replaced wheel hubs before, review procedure in manual carefully!
Rotate rotor slowly while tightening slotted nut to 50# to ensure thorough penetration of grease. Loosen the nut to remove all torque, and do not rotate hub while the nut is loose. Finger tighten slotted nut until snug, and back it off until the first slot lines up with the hole in spindle shaft. Secure nut with cotter pin, and seal rotor with cap.


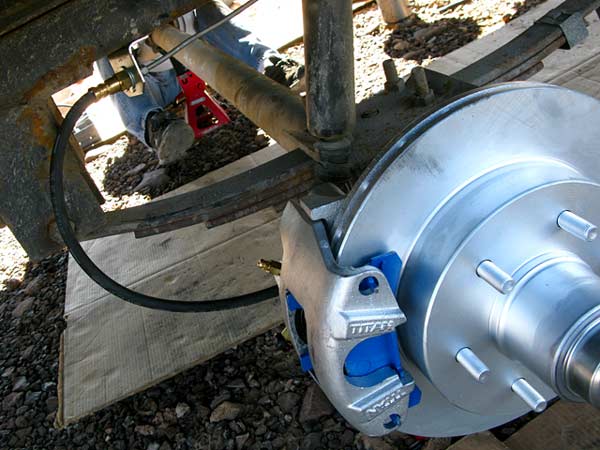
4. Mount brake calipers.
Insert the provided brake pads into calipers and install calipers onto caliper brackets by sliding opening between the brake pads over the rotor. Use two caliper guide bolts to attach caliper to caliper bracket. Torque caliper guide bolts to 40-50 ft-lbs.
Be sure to use high strength Loctite threadlocker on all caliper and bracket bolts.
Check clearances around all brake components including rotor, caliper bracket, and caliper. Make sure rotors spin freely. Any drag should decrease significantly after roughly 100 miles of use.


5. Install BrakeRite actuator.
Follow detailed steps in the Titan BrakeRite Manual to install the hydraulic pump. The Brakerite mounting bracket can be attached directly to the trailer frame. I chose to mount mine in our old battery compartment. Run new wiring from your trailer cord wiring harness to the pump.
Be sure to remove all connections to any old electronic brake wiring to avoid having any open circuits.
5b. Quick BrakeRite Wiring Reference:
- Black, White & Blue to: Trailer Plug
- Brown to: Breakaway Switch
- Purple to: House Power
- Consult with Ron if you have to pull power directly from a 6v battery bank! There may be a specific post in the series recommended for the connection.
Supply 12v power from your house batteries to the BrakeRite actuator. This will ensure the pump starts if the breakaway switch is engaged. Since we installed the BrakeRite in our old battery compartment, we had easy access to 12v house power.


6. Run hydraulic lines.
Flexible brake lines are provided for attaching to the BrakeRite unit, and to each brake caliper. The flexibility allows for movement in the lines caused by suspension of the trailer.
Connect rubber lines to calipers (and BrakeRite) and mount other ends to the frame. From these points you will run the metal tubing along the frame from the BrakeRite to each caliper line. With the metal tubing already cut to length and flared, simply coil up excess line in loose loops to take up any slack.
If you have insulated tanks, run all lines along frame or use same screw holes securing the Coroplast lining to avoid interference from the lines if you need to service any concealed plumbing.


7. Bleed brakes.
Fill the BrakeRite reservoir with brake fluid. You can use synthetic, DOT 3 or DOT 4. But whatever you use, be sure to use the same type whenever topping off fluid.
Bleed the brake lines of all air prior to operation. Start at the furthest caliper from the pump and work forward. Loosen the top bleed screw on the caliper and have someone pull the breakaway switch to engage the pump. Tighten the screw as soon as fluid flows without bubbles and reinsert the breakaway key. Repeat for all calipers.


8. Install new brake controller (if applicable).
This can be done at anytime during the install process. It is likely the easiest step, especially if the new controller has a pigtail attached for connecting to your truck wiring. Ensure that your chosen controller is compatible with hydraulic brakes like the Tekonsha P3 brake controller we purchased.I like the P3 because it comes in various models with wiring harnesses to work with specific trucks.
Set the controller to Hydraulic (not Electric), and configure the Gain and Boost according to the calibration directions and you are ready to go for a test drive!
NOTE: The coating on the discs, and any residue remaining from installation will wear off within 100± miles requiring adjustment of the controller.
Hydraulic Brake Conversion Summary
Trust me, you will notice an immediate improvement in stopping performance. I sure did! We’ve now driven nearly 1,000 miles with our new Titan disc brakes. The difference over the old drum brakes is amazing. They are much more responsive, and braking, “feels like stopping a car” as Rene described it.
No longer do we have that feeling of being pushed by the trailer when needing to stop quickly, which we had to do when cut off in Tuscon traffic. It was a perfect test for our new hydraulic brakes. And instead of cringing, we were both smiling, happy with our investment.
Yes, it is an investment. But this is another one of those cost of lifestyle decisions. The complete system, including installation, cost us nearly $3,000. A small price to pay for the peace of mind we’ll have for years to come.
Where is the brake reseviour and how do you take off the caps. They won’t come off and I don’t want to snap them off with a pliers???? This is the most important saftey step but no pictures from the manual or instructions or diagram??? Ridiculous
Ridiculous!? I don’t think so. The reservoir is built in to the actuator pictured in the center photo under section four above. The caps screw on/off and have a hex shape for channel lock use if too tight. Nothing ridiculous about that.
Nice setup but a shitty job of routing brake lines I thought that guy was a pro
Have a 14,000lbs equipment trailer, what is the cost of the kit to convert it to disc brakes?
Check performancetrailerbraking.com!
Glad you took the plunge into disc brakes. I did my (former) 5ver in 2007 after returning from a trip to the Rockies where I lost ALL brakes twice due to fade. I said never again. When I got home I installed Kodiak discs and a Dexter actuator. One thing I’ll offer up-don’t bother with the coiled up tubing in the kit; just go down to your local NAPA or other parts store and buy lengths of straight brake tubing, its sold with pre-flared fittings on each end. You will use different length sections as you plumb your system. Coiled tubing just adds flex to what should be a solid system, use as little tubing as needed for the job. Great braking and no fade.
Thanks for the feedback Bill! So far so good, but I’ll consider your suggestion for down the road and keep it here for others to see.